Friday 31 August 2018

DLP Solutions for iPhone


DLP Solutions for iPhone

Part 1: What is DLP?

DLP can have various meanings depending on the setting in which it is being used. However, just like its name suggests, it refers to making sure that data is not lost.

When DLP is being used in a company or corporate setting, it will refer to ensuring that the end users are unable to send any critical information about the corporate to outsiders. In this scenario, DLP will be used to describe the software products which are capable of helping a software administrator control the kind of data an end user is allowed to transfer.


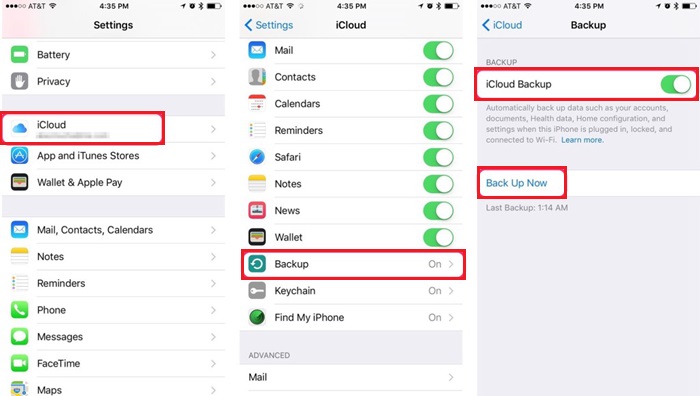
Coming back to an individual, let’s assume that individual is you. You probably own an iPhone that carries your critical data. For example, client contacts, important emails, photos, text messages, WhatsApp data and more. In case you were to lose this data, you would have to go through a lot of stress while trying to get your data back. Sometimes, getting the data back will be impossible. Now, in your case as an iPhone owner, you would want to have Data Loss Prevention in place. One of the best DLP solutions you can use is creating a backup for the iPhone so that you can get your data back if you happen to lose it.
Part 2: Differences between DLP in General & DLP of Making Backups

DLP, in general, refers to solutions which help corporate to keep their critical data from being shared with outsiders. This is different from the DLP of making backups. In creating a backup, say for your iOS device, you are not protecting your data from being shared with outsiders. You will just be making sure that you never lose the data yourself. In the general DLP, business rules are utilized in order to classify and also protect the critical and confidential data. In the DLP of making backups, no rules are applied. It will be only you creating your backups.
Part 3: Why Need DLP Solutions of Making Backups for iPhone?

Chances are, you are asking yourself why you really need DLP solutions for your iPhone. After all, you see yourself always having the iPhone with your daily life. Below, we show you some of the reasons why DLP solutions for an iPhone are necessary:
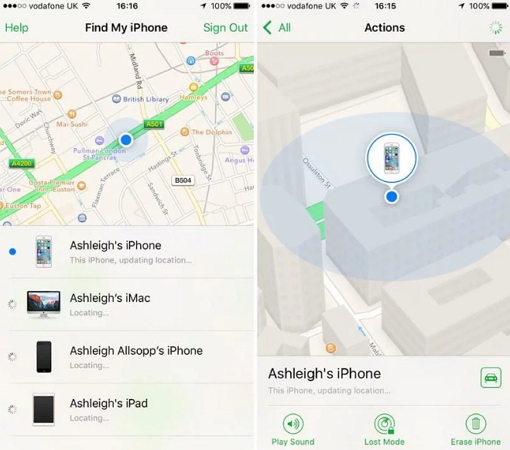

Theft

Imagine some guy just snatched your iPhone and took off. Theft is common and it has already happened to the majority of us. If your iPhone is stolen from you, it will disappear with all your important data.


Hardware Failure

iPhones are man-made which means that they can fails sometimes. Actually, any iPhone can decide to fail completely without a warning sign. If the device fails while it still has data on it, that data could be gone for good.


Malicious Attack

The internet has wicked people. Everyone uses their iPhone to check out websites and also download stuff from download sites and their email. What if some wicked hacker managed to infect your iPhone with a virus that is capable of crippling your whole iOS system? You could re-install your iOS to fix this. But then, your iPhone will be as good as new after the iOS installation. Your important data will be gone.


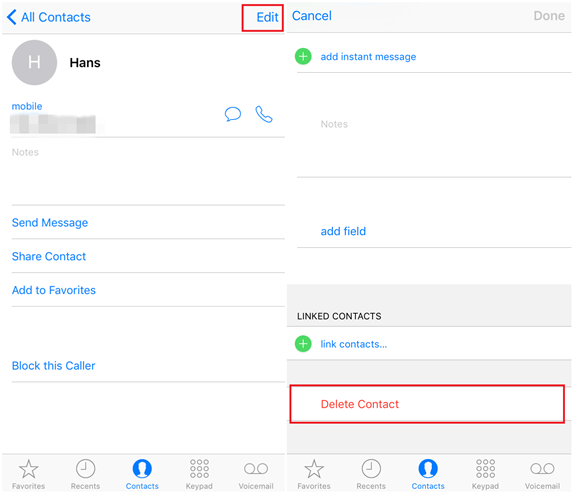
Losing Data by Mistake


No one is perfect. You may end up erasing your important data from your iPhone by mistake. Also, your kid could too. If that data was not backed up, there is no way to get it back.


You may also like:Gihosoft Mobile Transfer: 1 Click Data Transfer from Phone to Phone

Gihosoft Android data recovery Free is a super awesome software specialized in Android file recovery. With this program, you are able to recover deleted photos, music, videos, messages, contacts, call logs, WhatsApp messages, Viber chat history and more from Samsung, Huawei, LG, HTC, Motorola, Google, Oneplus, Sony, Lenovo, ZTE and other Android devices directly. Meanwhile, this Android data recovery software is available for both Windows and Mac platforms.For now, check:Free iTunes/iPhone Backup Extractor for iPhone, iPad

Jihosoft iTunes Backup Extractor free is a powerful tool to recover and extract important data from iPhone, iPad & iPod touch backup on Windows or Mac.

If you can’t sync with iTunes and want to rescue data from a disable iPhone, you could try Gihosoft iPhone Data Recovery. Also feel free to ask questions on the iDevice is disabled error in the comments section below.

How to Get Old Messages Back on iPhone by Restoring iTunes or iCloud Backup


How to Get Old Messages Back on iPhone by Restoring iTunes or iCloud Backup
Get Old Messages Back on iPhone by Restoring iTunes or iCloud Backup

You can also restore iTunes or iCloud backups to your device using the sources itself for getting back the messages. Please note that the other data on your device will be overwritten by the backup. The following section will show you the tutorials for both. Let's get started one by one.

Follow the steps below to get old messages back on iPhone when you have made backup with iTunes.


Firstly, launch iTunes and connect your iOS device with the PC.


On successful connection, make sure to click on the device icon at the top in the iTunes interface.


Hit on 'Summary' tab now and go to 'Restore Backup'. Choose a backup that contains your old messages. This way your messages will be back to you.


Here are the steps to get messages back on iPhone by restoring iCloud backup.


Firstly, go to 'Settings' and tap 'General'.


Now, hit on 'Reset' followed by 'Erase All Contents and Settings'.


Now, turn off your device and turn it back on.


You will reach to the setup screen. When you find the 'Apps & Data' screen, you need to tap on 'Restore from iCloud Backup.


Enter the same iCloud credentials and choose the backup to get your messages back.


You may also like:Gihosoft Mobile Transfer: 1 Click Data Transfer from Phone to Phone

Gihosoft Android data recovery Free is a super awesome software specialized in Android file recovery. With this program, you are able to recover deleted photos, music, videos, messages, contacts, call logs, WhatsApp messages, Viber chat history and more from Samsung, Huawei, LG, HTC, Motorola, Google, Oneplus, Sony, Lenovo, ZTE and other Android devices directly. Meanwhile, this Android data recovery software is available for both Windows and Mac platforms.For now, check:Free iTunes/iPhone Backup Extractor for iPhone, iPad

Jihosoft iTunes Backup Extractor free is a powerful tool to recover and extract important data from iPhone, iPad & iPod touch backup on Windows or Mac.

If you can’t sync with iTunes and want to rescue data from a disable iPhone, you could try Gihosoft iPhone Data Recovery. Also feel free to ask questions on the iDevice is disabled error in the comments section below.

Wednesday 29 August 2018

How to Backup SMS on iPhone (iOS 12 Supported)

How to Backup SMS on iPhone (iOS 12 Supported)
1. Backup SMS on iPhone with iTunes or iCloud

The most common way to back up texts on iPhone is to use Apple's official services – iCloud and iTunes. This part of the article will explain how to make iOS backup messages to iTunes or iCloud.
Backing Up iPhone SMS with iTunes

To back up your iPhone's messages with iTunes, you will need to have already installed the iTunes software on your computer and open it.


Connect your iPhone to iTunes and enter your passcode on your device if asked.


Your device will appear on iTunes. Click the icon of your device.


Choose Summary > Backups and then click Back Up Now to start the process.


Wait for the process to complete.


To confirm whether the process is done, check the Summary screen for the date and time of the Latest Backup.
Create iPhone SMS Backup with iCloud

To do SMS backup on iPhone with iCloud, the first thing you will need to do is connect your device to a Wi-Fi network.


On your iPhone, go to Settings > [Your Name] > iCloud > iCloud Backup.


Toggle on iCloud Backup and tap Back Up Now to start the backup process.


Wait for your device to complete the process.


To confirm whether the backup process is done, check the name of Last successful backup which is under Back Up Now.
Backing Up with iCloud Automatically

Instead of backing up manually, you can set your iPhone to back up messages automatically with iCloud. Follow these simple steps to go about this:


Turn on iCloud Backup by going to Settings > iCloud > iCloud Backup.


Then once you connect your device to a Wi-Fi network and to a power source and close your iPhone screen, then iCloud will back up your SMS on iPhone by itself.

Remember to ensure you have enough space in iCloud for the backup. If the iCloud space is not enough, the backup will fail.Jihosoft Android Data Recovery: the best Android Data Recovery software for Windows and Mac to recover deleted contacts, messages, photos, videos, WhatsApp and etc from Android devices.

Gihosoft Android data recovery Free is a super awesome software specialized in Android file recovery. With this program, you are able to recover deleted photos, music, videos, messages, contacts, call logs, WhatsApp messages, Viber chat history and more from Samsung, Huawei, LG, HTC, Motorola, Google, Oneplus, Sony, Lenovo, ZTE and other Android devices directly. Meanwhile, this Android data recovery software is available for both Windows and Mac platforms.For now, check:Free iTunes/iPhone Backup Extractor for iPhone, iPad

Jihosoft iTunes Backup Extractor free is a powerful tool to recover and extract important data from iPhone, iPad & iPod touch backup on Windows or Mac.

Shortcomings of iTunes and iCloud

Although iTunes and iCloud help back up your iPhone's messages, they come with several disadvantages.


The first downside is that you have to back up all your data to store your messages safely. This uses up a lot of space as you will have to store data that you necessarily do not need.


To make matters worse, iCloud only offers 5GB of free space. Therefore, if you need extra space, you will have to pay for it.


Additionally, you cannot access your SMS with iCloud or iTunes unless you restore the backup. Restoring, on its part, overwrites the current data on your device.


Lastly, you are likely to incur many errors when backing up your iPhone with iCloud or iTunes. For example iTunes' Back Up Now button is greyed out.If you lose any data on iPhone/iPad, Gihosoft iPhone Data Recovery is a good choice to help you easily get back lost/deleted data, including important messages, contacts, voicemails and so on.


Free iTunes/iPhone Backup Extractor for iPhone, iPad.


Jihosoft iTunes Backup Extractor is a powerful tool to recover and extract important data from iPhone, iPad & iPod touch backup on Windows or Mac.


Gihosoft Total Video Converter is a professional all-in-one video tool that enables you to convert videos and audios into various different formats.


You may also like:online youtube downloader

Monday 27 August 2018

Tips for make a photo square without cropping for Instagram 2019


If you are searching for how to make a photo square without cropping, that can help you post your whole picture without the hassle of cropping it for Instagram, you have clicked on the right article. You must have seen people posting their whole picture in a square cropped image. The square helps you in posting the complete picture. In this tutorial, we are going to help you by showing how to resize your photo for Instagram without cropping it. There are various apps out there that can help you in doing so, but here we are using ‘No crop’ photo editing application (No Crop Instagram).

Worth Reading: The Best Snapchat Like Face Filter Apps


How to make a photo square without cropping for Instagram?

To make a rectangular picture square without cropping follow these steps:


Go to google play store.


Search for ‘no crop’ for Instagram or download it from here. You can also use other apps like Instasquare, Squarequick, Squarepic etc. I am using this one because it’s fast and easy.


Open the No Crop for Instagram and select the edit option on the right side.


There you can select the picture (Any Rectangular Picture) of which you want to make a photo square.


You can choose where you want to place the picture in the box and accordingly resize it.


You can also make changes in the background style, the angle of the pic, resize for Instagram.


Then click on the share button on the upper right corner where you can save the picture to your gallery or directly post it on Instagram.


Thus using the ‘no crop’ app you can edit your photo beautifully without any trouble. Thus No Crop is the best square photo editor without cropping.

Other features of the no crop app are:


Add templates and the make your own collage function.


You can choose 200+ free background patterns.


30 filters to make your photos more beautiful.


400+ free stickers to personalize your photo.


The app also has filters, smileys or text options that can you can add to your pictures.


Share photos to Instagram, Facebook, Twitter, Google+ or anywhere else.


Add text with different fonts and resize text.


There are other apps with the same features, some of them are:
Insquare

With insquare photo editor, post your photos and collage to Instagram quickly or resize photos to fit Instagram Wall. This is the best editing app that you need to create and share beautiful photos with emojis. tags and fonts.


Main Features


Unique Photo filters.


Add light leak effect turn your photos in art.


Trending hashtags to make your photos to get more likes.

Square quick

Squarequick pro is a photo editor and collage maker you can create amazing high-quality pictures and collage photo grids for Instagram and Instagram story using various filters, stickers, background, and text.


Main Features


Make your pics in a square.


Snap color text on your image.


Adjust brightness, contrast, temperature, and saturation.

Square pic for Instagram

In an instant, you can square your pic, its the most simple and easy no crop photo editor for Instagram. It’s the best companion for Instagram. You can edit your pictures, add fonts and filters and make your photo insta worthy in just a few seconds.


Main Features


Add emoji sticker.


Apply fillers to a cropped photo.


Set blur background.


Make a rectangular picture square without cropping.

Square fit for Instagram

You can make your photo square easily and also make a beautiful photo collage. This app enables you to post an entire photo on Instagram without cropping. Its one of the best no crop photo editor for Instagram with blur border. It’s also a photo collage maker.


Main Features


Post full sized pics on Instagram.


Squares photos in seconds.


Grid photos into pic collage.


Save photo with high quality.


If you liked this tutorial don’t forget to share it with your friends on Facebook or Twitter. You can also comment down below any app suggestions or topic recommendations.


Recommended For You:

Fix WeChat Login Errors

How to Hide Secret Apps on Android Phone

The Best Mobile Keyboard Apps for Android in 2019

The Best Android Backup Apps 2019

What to Do If Your Google Play Store Stops Working?

Fix SD Card Not Detected on Android


Jihosoft Android Data Recovery is the most powerful and professional data recovery software for Android that can restore deleted or lost contacts, photos, videos, audios, SMS, call logs, WhatsApp chat, Viber messages from any Android devices due to accidental deletion, virus attack, formatting. It supports all popular Android smartphones and tablets like Samsung, HTC, LG, Huawei, Motorola, Nexus, etc. In the meantime, you will be guided step by step if you never used this kind of tool before.


Best Samsung Data Recovery Software:
Easily Recover Deleted/Lost Photos, Messages, Contacts, Call Logs, WhatsApp,
Musics, Videos etc. from All Samsung Devices


Download iOS 12 Beta 11 without developer account


Download iOS 12 Beta 11 without developer account
WHAT’S NEW IN IOS 12 BETA 11?


iOS 12 Developer Beta 11 is just another minor update that focuses on performance improvements and bug fixes. Nevertheless, it introduces some changes that were missing from older versions; for example, the closing-app animation is now faster than ever.


The build number of this version is 16A5365b and it weighs around 60-80 MB on all compatible devices. Owing to its size, it clearly is not the GM build that we are all waiting for.


Alongside iOS, Apple has also seeded tvOS 12 Beta 9 and macOS Mojave Beta 9 to developers.


If you are a registered Apple developer, you can download this update straight from the Developer Center.


For those of you who aren’t a part of the beta tester program, just grab the OTA Profile given below and get downloading.
DOWNLOAD IOS 12 BETA 11
OTA PROFILE
IPHONE


iPhone SE, iPhone 5s


iPhone 6s, iPhone 6


iPhone 6s Plus, iPhone 6 Plus


iPhone 8, iPhone 7


iPhone 8 Plus, iPhone 7 Plus


iPhone X
IPAD


iPad Air, iPad mini 2


iPad mini 4, iPad Air 2, iPad mini 3


iPad (5th generation), iPad (6th generation)


iPad Pro (9.7‑inch)


iPad Pro (12.9‑inch)


iPad Pro (10.5-inch), iPad Pro (12.9-inch) (2nd generation)
IPOD


iPod touch (6th generation)
SHOULD YOU UPGRADE?


As the Developer Beta 11 brings nothing new to the table, there’s no point in updating. However, if you are affected by the “OpenVPN disconnect” bug, you must update as soon as possible.


Apple is still holding back the Golden Master update for some reason. Once that update goes public, you can freely upgrade your Apple device.


As always, don’t forget to follow us on Twitter and Facebook for more firmware news and updates.You may also like:Gihosoft iPhone Data Recovery


Must Read:Gihosoft Free Android Data Recovery


Must Read:Jihosoft iTunes Backup Unlocker


Jihosoft iTunes Backup Extractor free is a powerful tool to recover and extract important data from iPhone, iPad & iPod touch backup on Windows or Mac.


You may also like:


Gihosoft Total Video Converter is a professional all-in-one video tool that enables you to convert videos and audios into various different formats.


You may also like:online youtube downloader

Free iCloud Backup Extractor 2019

Free iCloud Backup Extractor 2019

Part 1: How Can I See What is in My iCloud Backup?
It is possible to view the backups available on your iCloud backup and manage them. However, seeing the data available in your backup files is not very easy. To view your backups and manage them, follow the simple steps outlined below:
On iOS Devices


On iOS 11: Launch Settings, click [your name], tap iCloud, click Manage Storage and then tap Backup.


On iOS 10.3: Open Settings, tap [your name], and tap iCloud. After clicking the graph that indicates your iCloud storage usage, click Manage Storage.


On iOS 10.2 and below: Open Settings, click iCloud, tap Storage, click Manage Storage.


On Your Mac


Step 1: Tap the Apple Menu and then choose System Preferences.


Step 2: Tap iCloud and then click Manage. Choose Backups.


On Your PC


Step 1: Launch iCloud for Windows and tap Storage.


Step 2: Choose Backup.


Part 2: What You Can See with Official iCloud Methods for Free
How to View iCloud Backup through iCloud.com


Through the iCloud main website, Apple allows users to view their backups remotely. All you need to view the iCloud backups is a stable internet connection, a web browser, and your Apple ID and password. To view your iCloud backups on iCloud.com, follow the simple steps below:


Step 1: Launch a web browser on your computer and visit icloud.com. Use your Apple ID and Password to sign in.


Step 2: On icloud.com, you will be allowed to view various data types. These include contacts, calendars, and notes. To view a specific data type, tap on its icon to open it.


The only benefit this method offers is that you get to view your data remotely without the need to have your iOS device with you. The cons this method presents include that it only allows you to view specific data types. This means that you won’t have the ability to access some of your data including WhatsApp data, Kik, Viber, photos, videos, and more.
How to Access iCloud Backup through iCloud Control Panel


The iCloud Control Panel is used by people who own a Windows PC. To view the data you have on your iCloud backup using this control panel, follow the steps below:


Step 1: Download the iCloud Control panel and install it on your PC. After the installation, launch the tool and sign in using your Apple ID and password.


Step 2: The control panel will have some options which will allow you to view the backups you have on your iCloud account. The options available include iCloud Drive, Photos, “Mail, Contacts, Calendars, and Tasks”, and Bookmarks. If you wish to view the content available in the iCloud backup for, say, Photos, click Options and then tap Next. The photos available on your iCloud backup will be saved to: This PC > iCloud Photos folder on your Windows PC.


The most notable benefit this method has is that it allows the user to view the iCloud backup data on the Windows PC. However, the method has numerous disadvantages. For example, you are allowed access to a limited number of files. The iCloud control panel will not show you data like iMessage data, WhatsApp Data, WeChat Messages, and more. Also, before restoration, iCloud Control panel will not allow you to preview your data.


If you are interested in viewing all the content available in your iCloud backup without any limitations, you will need a professional iCloud backup extractor with free trial version. Such a tool will allow you to view the data present in each backup file. But is such a tool available? Let’s find out.


Jihosoft Giveaway Alert:


iPhone Backup Extractor - Extract Data from iPhone Backup


The best iPhone Backup Extractor Free software to extract photos, text messages, contacts, voice memos, note, WhatsApp, Viber and etc from iPhone/iPad backup.


You may also like:Gihosoft iPhone Data Recovery


Must Read:Jihosoft iTunes Backup Unlocker

Sunday 26 August 2018

How to Delete Photos & Videos from iCloud


How to Delete Photos & Videos from iCloud

There are two options for iCloud Photo Library.


If you choose Optimize iPhone Storage, the full-resolution photos and videos will be saved in your iCloud account and the optimized version will save on your iPhone, which saves space for iPhone. However, there is no way to delete photos from iCloud.


If you choose Download and Keep Originals, the full-resolution will be saved in iCloud and iPhone. In this case, when you delete photos and videos from iPhone, it will delete them from iCloud as well.Must Read:tumblr video downloader
Steps to Delete Photos & Videos from iCloud and iPhone:


Open the Photos app on your device, and then tap Photos at the bottom of your screen.


Tap Select, and then choose the photos and videos you want to delete.


Tap the trash icon, and then tap Delete XX Photos to confirm.


Go to Albums from the bottom and select Recently Deleted album.


Click Select and then Delete All to empty the trash folder, which means photos are deleted from iPhone and iCloud.Jihosoft Giveaway Alert:


iPhone Backup Extractor - Extract Data from iPhone Backup


The best iPhone Backup Extractor Free software to extract photos, text messages, contacts, voice memos, note, WhatsApp, Viber and etc from iPhone/iPad backup.


You may also like:Gihosoft iPhone Data Recovery


Must Read:Jihosoft iTunes Backup Unlocker
Stop iCloud backups and My Photo Stream

If you don't want to upload anything to the cloud any more, you can turn off iCloud backups and My Photo Stream. If you go down this route, you'll need to remember to plug your phone into your computer regularly so that you can back it up to iTunes manually. To turn of My Photo Stream go to Settings, iCloud, Photos. Turn off My Photo Stream and tap Delete when prompted to remove all iCloud images from your device. To turn of backups, go to Settings, iCloud, Storage & Backup and turn off the iCloud Backup option. Remember to do these steps for all of your devices.


How to stop Dropbox from uploading

If you're using Dropbox open up the app and tap Settings. Select Camera Upload and turn the option off. This doesn't remove the photos from your phone, so open up the Photos folder and delete them from there. If you're using an alternative cloud storage app, check its instructions to find out to disable and delete automatic backups.


Saturday 25 August 2018

How to Lock Apps On iPhone?

How to Lock Apps On iPhone?
Lock Apps On iPhone

Method 1: How to Lock Apps on iPhone Via Restrictions?

This iPhone feature restricts your child from accessing certain apps on your phone. It also prevents them from making in-app purchases, blocks access to websites you wouldn’t want them to visit, etc. To enable restrictions on your iPhone, follow the simple steps below.


Step 1.Go on your iPhone Settings >> General >> Restrictions.


Step 2.Click Enable Restrictions, and it’ll ask you to enter your Restrictions passcode. Create a passcode you can easily remember. It should be different from your device code.


Step 3.After confirming the passcode you’ll have a list of sections with different options to activate or deactivate.


Once you’re done enabling restrictions, the next thing is to go over the different available sections to select apps you want to restrict. In the first section, apps and features including Safari, Camera, FaceTime, Siri & Dictation, AirDrop can be blocked by simply toggling any of them. In the second section, you have options of deciding if you want to restrict your child from purchasing, downloading and installing apps and other contents. Apps like iTunes Store, iBook Store, and Podcasts can be blocked in this section as well.

Toggling the Installing Apps and Deleting Apps feature off will give you child access to the stores, however, they won’t be able to purchase or install any app. You can also disallow in-app purchases and a list of other apps.Must Read:tumblr video downloader

Must Read:Jihosoft iTunes Backup Unlocker

You may also like:online youtube downloader
Method 2: How to Lock Apps on iPhone Via Guided Access?

Guided access can be used to temporary lock down your iPhone to a single app. With guided access, you can app lock iPhone features, prevent typing, disable motion sensors, disable most areas of the screen, etc. To set up guided access on your iPhone, follow the steps below:

Step 1.Go to iPhone Settings >> General >> Accessibility >> Guided Access. Toggle Guided Access ON.


Step 2.Click Passcode Settings to set up a passcode you can remember. This is to help stop your child from ending guided access session. You can also use your fingerprint to end a session if your device has Touch-ID enabled.Jihosoft Giveaway Alert:

iPhone Backup Extractor - Extract Data from iPhone Backup

The best iPhone Backup Extractor Free software to extract photos, text messages, contacts, voice memos, note, WhatsApp, Viber and etc from iPhone/iPad backup.

You may also like:Gihosoft iPhone Data Recovery

Must Read:Jihosoft iTunes Backup Unlocker


Step 3.Click Time Limits to select a sound to play when guided access session is about to end. You can as well set it to speak the remaining time.

Step 4.Click on Accessibility Shortcut to set up accessibility shortcuts during a session. Triple click the home button to bring up a menu with accessibility shortcuts.

Now you’re done setting it up, take the following steps to enter Guided Access:

Step 1.Click to open the app you want to use.

Step 2.To enter the session screen triple click the home button.

Step 3.Using your fingers, circle out parts of the screen you want to disable.


Step 4.Tap on Options in the bottom left corner to choose whether or not you want to grant access to the Sleep/Wake button, Volume buttons, touch screen, and motion. Tap Done to save your selections.

Step 5.Click Start to begin session.
Lock Apps On iPhone

Method 3: How to Lock Apps on iPhone Via Third-Party App?

Apart from the app lock features that come with your device, there are also lots of third-party iPhone locking apps that can app lock iPhone with ease. However, before we proceed, it is important you know that most of these iPhone locking apps work only on jailbroken iPhones. To use this app, you’ll have to jailbreak your device, but if you’re not a fan or you simply don’t want to jailbreak your phone, the first 2 options should do.

For illustration purposes we’ll be making use of an AppLocker. Available as just $0.99, AppLocker doesn’t just lock your apps, but also locks folders, accessibilities, settings, etc. Follow the steps below to lock your device using AppLocker:

Step 1.Download and install the app on your device (works on iOS 6 to iOS 10).

Step 2.Go to Settings >> AppLocker. Enable it and set up a passcode.

Step 3.To app lock iPhone, click on Application Locking.

Step 4.Click on apps of your choice to enable or disable. To change your passcode, simply go to Reset Password Phrase.

Tuesday 21 August 2018

How to Clean Your Apple Keyboard and Mac Display 2019


How to Clean Your Apple Keyboard and Mac Display the Right Way


Jump To:


3 Tips to Perfectly Clean iPhone Charging Port Without Any Damage


How to Free Up Storage on Your iPhone (Any Generation)


Is your Apple keyboard looking a little sticky these days? Does your screen have more spots than you feel comfortable with? Then it's time for a cleaning session.

Apple products aren't exactly like other types of keyboards or displays, so not all of the same cleaning rules apply. Before you start, let's walk through the best ways to clean up your keyboard and display, and what you should avoid.

( These tips work well for MacBooks as well as independent displays, although you may have to clean both the display and keyboard both at the same time for best results.).


How to Clean Your Apple Keyboard Safely


Unplug Your Keyboard and Shake It Out


Unplug your keyboard first for safety – in fact, it’s a good idea if you take your keyboard away from your desk entirely so you won’t bump or damage your other accessories by accident.


If you use one of Apple’s wireless keyboards, remember to remove the batteries first and set them aside before you begin.


Turn your keyboard upside over the trash and give it a light shake to remove any obvious bits of debris.


Stay Away from Cleaners, Grab Water


It may seem counter-intuitive, but you shouldn’t use any cleaners on your Apple keyboard.


Likewise, stay away from solvents, acids, and basically any chemicals. Don’t use any cleaner, natural or store-bought. There’s a chance they could seep down into your keyboard and damage delicate components waiting there (this is also a good reason to try to avoid spilling anything on your keyboard).


So, stick with plain, clean water. A small bowl is all you need, or a nearby faucet.


Pick the Right Cleaning Instrument.


Don’t use anything abrasive on your keyboard – so stay away from hard sponges and any rough “scrubbing” materials. These could rub off the letters on your keys and cause other damage, which is never cool.


Instead, pick out a clean, lint-free cloth for your work. The lint-free part is important for two reasons.See More


First, little bits of lint can get caught around your keys or maybe even trapped underneath some keys, which can cause additional problems. Second, lint is often a sign of some static charge. You really don’t want to use any cloth that can build up a static charge while you are cleaning your electronics, since there’s a chance it could damage sensitive components.


Clean Carefully


Get your clean cloth a little damp with water, and thoroughly wash the outside of your keyboard. Obviously, you will want to pay close attention to the keys themselves and the space between them, where most of the grime tends to gather.


If you hit a spot that doesn’t come out easily, don’t switch materials: Instead apply increased pressure until it is slowly removed.


Apple keyboards are generally quite easy to clean and you should be able to get all the stains off.


When you are finished, set the keyboard aside for 20 minutes or so that it can dry out, and then reconnect it to your computer!
How to Clean Your Mac or MacBook Display Safely


Unplug Everything


Detach all of your accessories from your Apple display (if you are cleaning this at the same time as your keyboard, that’s already done!), and unplug anything else that may be connected.


When that’s done, unplug your display from its power and from the computer itself, if possible. Leave it totally isolated. This is just a simple safety step to make sure nothing bad happens.


Choose Your Cloth Wisely


Now comes the tricky part. Do you still have the smooth felt cloth that came with your Apple Display? That is easily the best cloth to use for this project. However, if it’s been a while since you bought your display, there’s a good chance that the cloth may have become…misplaced.


If that’s the case, scrounge around in your electronics drawer and see if you have any more of these smooth cloth wipes. They tend to come with a lot of display-oriented technology, so there’s a chance you may have hoarded a few in the past for just a time like this. If there’s no luck on that front, find the softest, smoothest cloth you can. You don’t want any scratches on the Retina screen, right?


Use a Display Cleaner Spray When Possible


Water can work when cleaning your display as long as you make sure there is no residual moisture left on the screen. However, for particularly dirty displays or a more thorough cleaning, you need to get a dedicated screen cleaner.


Whatever you do, don’t use just any cleaner lying around. You should be especially careful to avoid cleaners that have acetone, ammonia, or any type of solvents. Avoid using any type of window cleaner or house cleaner. These sprays may damage your display, especially if used over time.


Start Wiping!


Never spray water or cleaner directly onto your display. You can’t really control where the spray goes, and there’s a chance that some can leak into the components and cause damage there.


Instead, apply any cleaners to the cloth and start wiping the screen.


Start at one corner, work your way down, and continue moving up and down. A gentle, straightforward wiping motion should be sufficient to clean your display.


Remember to keep a side of your cloth dry to wipe off all of the moisture when you are done.


Free iTunes/iPhone Backup Extractor for iPhone, iPad


Jihosoft iTunes Backup Extractor is a powerful tool to recover and extract important data from iPhone, iPad & iPod touch backup on Windows or Mac.You may also like:


Gihosoft Total Video Converter is a professional all-in-one video tool that enables you to convert videos and audios into various different formats. You can also download videos from YouTube or other online video sharing sites and convert them easily. Plus, you’re able to personalize your videos with its inbuilt editor, such as, trimming, cropping, applying video effects, adding watermark, subtitles, and more. If you need a powerful and professional desktop video converter program, just download Total Video Converter and follow the step-by-step guide here to have a try.

You may also like:


How to Create an Apple ID without Using a Credit Card


iOS Mirror Apps to Wireless Stream Your iPhone/iPad Display


3 Methods to Recover Deleted Photos and Videos from iPhone/iPad


How to Optimize iPhone Storage? Learn the Best Way 2019

How to Optimize iPhone Storage? Learn the Best Way

Choose "Optimize iPhone Storage" under iCloud Photo Library
What Does "Optimize iPhone Storage" Mean?

Optimize iPhone Storage is a feature included in Apple's iCloud Photo Library that allowsyou to replace all your full resolution photos and videos with smaller, device-sizeversions.

When you turn on the "Optimize iPhone Storage" option you will be able to save a lotstorage for your iPhone.

You can download the full resolution versions of your photos and videos from iCloud anytime.

Optimize iPhone Storage vs. Download and Keep Originals, What's the Difference?

The 'Optimize iPhone Storage' feature stores your local photos and videos at low resolution. These photos and videos take up relatively less space, hence your storage is optimized to allow for more content to be stored.


The 'Download and Keep Originals' feature downloads all your photos and videos from your iCloud account at full resolution. You should use this feature if you have plenty of free space on your iPhone.
How to Turn On "Optimize iPhone Storage" to Save Space?


First, make sure you are connected to a working Wi-Fi.


Then launch the Settings app and navigate to Photos & Camera.


Now tap on the Optimize Storage option to turn it on.
Delete Old Messages to Optimize Storage on iPhone

Your iMessage conversations can take up a lot of storage space if they are not deleted very often. This is because your messages do not just contain the text, they also contain any stickers, gifs, photos, and videos you send or receive. Fortunately, there is an efficient way to make sure that your older message threads get deleted automatically. You will simply need to specify a time period for how long your messages should be kept on your device before getting automatically deleted.

Follow these instructions to optimize storage on iPhone:


Open Settings app on your iPhone.


Navigate to Messages > Keep Messages.


Now specify a time period (e.g. 30 days) for how long you wish to keep your messages stored. It is also recommended that you turn on Low Quality Image Mode so that the size of any sent or received files is automatically reduced.


Note

Following are some cons of this method of optimizing iPhone storage:For now, check:Free iTunes/iPhone Backup Extractor for iPhone, iPad

Jihosoft iTunes Backup Extractor free is a powerful tool to recover and extract important data from iPhone, iPad & iPod touch backup on Windows or Mac.

Jihosoft Android Data Recovery: the best Android Data Recovery software for Windows and Mac to recover deleted contacts, messages, photos, videos, WhatsApp and etc from Android devices.


You cannot select and delete messages in bulk via this method.


This method does not erase messages permanently so they can be recovered via a data recovery software.

Saturday 18 August 2018

Convert MP3 to M4R Ringtone in iTunes (Time-Consuming)

Convert MP3 to M4R Ringtone in iTunes (Time-Consuming)


One way to convert the file type of your music is straight within iTunes. It’s a bit cumbersome to do, but here are the instructions:


Step 1. Launch iTunes. If the mp3 is not already in your iTunes library, find it on your computer and drag it into iTunes.


Step 2. Within iTunes, right-click on the song you want to use as a ringtone and select Get Info.


Step 3. Click on the Options tab and set the start and end times of the ringtone (40 seconds max).


Step 4. Click Ok to save the settings.


Step 5. From the top menu, select File > Convert > Create AAC Version. (If you can’t see the Convert AAC Version, Please firstly go to “Edit > Preferences > General > Import Settings > AAC Encoder”.)


Step 6. Just right-click on the created AAC file and choose “Show in Windows Explorer” (or “Show in Finder” on Mac)You may also like:online youtube downloader


Step 7. Change the extension from .m4a to .m4r, which is the required extension for iPhone ringtones.


Step 8. Open iTunes again and delete the mp3 and AAC files.You may also like:online youtube downloader


Step 9. Connect your iPhone and click the device tab from iTunes. At the right panel, check “Manually manage videos”.


Sponsor Ads:Gihosoft Free iPhone Data Recovery is a professional iPhone Data Recovery software to get back all your lost text message, photo, video, call history, note, contact and more from iPhone/iPad/iPod Touch. It offers a full solution to recover your lost data in different tough situations. Besides recovering data directly from iPhone, iPad and iPod touch, it also allows you to recover data from iCloud and iTunes backup files.

Step 10. At the left side, click on “Tones” under On My Device. Just drag and drop the created .m4r file into iTunes library. The ringtone will be added to your iPhone.

For now, check:Free iTunes/iPhone Backup Extractor for iPhone, iPadJihosoft iTunes Backup Extractor is a powerful tool to recover and extract important data from iPhone, iPad & iPod touch backup on Windows or Mac.


Note


If you tried to follow the previous steps, you may have noticed how annoying the process is. You’ve got to switch in and out of iTunes, delete some files, and rename others. And you can’t even preview the song when trying to decide start and end times.

Friday 17 August 2018

What to Do When Wifi Greyed Out iPhone iOS 12?


How to Fix iPhone iOS 12 Wifi Greyed out
1. Reset Your iPhone’s Network Settings

Step 1: Go to settings on your phone and navigate to ‘general’.

Step 2: Scroll down until you find the reset option, and from there, you can choose to reset network settings.

Step 3: After about 2 minutes at max, the process will be completed and your iPhone will restart itself with default network settings. From there, you can attempt to reconnect to your chosen Wi-Fi access points to see if you have bypassed iPhone wifi greyed out.


Sponsor Ads:Gihosoft Free iPhone Data Recovery is a professional iPhone Data Recovery software to get back all your lost text message, photo, video, call history, note, contact and more from iPhone/iPad/iPod Touch. It offers a full solution to recover your lost data in different tough situations. Besides recovering data directly from iPhone, iPad and iPod touch, it also allows you to recover data from iCloud and iTunes backup files.


2. Reset RouterReset Router

Alternatively, sometimes it’s our Wi-Fi router instead of our device that is causing the wifi greyed out iPhone issues. You can try to unplug your router for about half a minute before plugging it in and switching it on again before you resort to reset your router.

To reset this, you can use a paperclip or something similar to hold down the reset button found at the back of your router for about 30 seconds. Afterwards, you will need to change your router’s Wi-Fi settings once more before you can use it again. This should be able to resolve most network issues.


4. Upgrade IOS System

Should the above options not work for you and the Wi-Fi icon still appears greyed out, you can try upgrading your iOS to a newer version.
Way 1

Step 1: Simply plug your device to charge and connect to the internet in whichever method you can.upgrade ios

Step 2: Go under settings and general, where you will find the software update option. Then, you just need to download and install this new update. You might need to remove some files to make space for the upgrade.


Way 2

In cases where you need to recover your data, you can do it via iTunes. Connect your iPhone to your computer and launch iTunes.

For iPhone 6s and earlier models:

Step 1: Press and hold the home & top or side buttons at the same time until you see the ‘connect to iTunes’ screen.

Step 2: You can try to choose Update to reinstall your iOS without losing data.

Step 3: Afterwards, you can set up your iPhone all over again.


Why My Wifi Greyed out iPhone iOS 12?


Usually, the wifi greyed out iPhone issue is caused by a hardware problem within your iPhone.


More specifically, the issue usually lies with the Wi-Fi antenna, which is directly under the earphone jack for iPhone in particular.


Any liquid or debris that falls into the earphone jack can potentially cause this issue.

You can check if your device has some water contact by looking down the earphone jack. The small circular sticker at the bottom will turn red if it has been in contact to water, so that will probably resolve your question as to why this problem will happen!


iPhone Backup Extractor - Extract Data from iPhone Backup

The best iPhone Backup Extractor software to extract photos, text messages, contacts, voice memos, note, WhatsApp, Viber and etc from iPhone/iPad backup.

Must Read:Jihosoft iTunes Backup Unlocker

Jihosoft Android Data Recovery: the best Android Data Recovery software for Windows and Mac to recover deleted contacts, messages, photos, videos, WhatsApp and etc from Android devices.If you can’t sync with iTunes and want to rescue data from a disable iPhone, you could try Gihosoft iPhone Data Recovery. Also feel free to ask questions on the iDevice is disabled error in the comments section below.

Real Fixes for Facebook Messenger Not Working on iPhone/iPad (iOS 12 Supported)


Rea

Facebook Messenger Not Working Issues


The following are just some common issues users struggle with when using Facebook Messenger.

Facebook Messenger Won’t Display Messages


The whole point of Facebook Messenger is the ability to display messages. If this isn’t happening, then you know that the app is really having issues. But before you try to fix the issue, make sure that the device is connected to the internet. When there is no connection, you will be unable to see messages on the app.

Facebook Messenger Won’t Deliver or Receive Messages


Another common issue users face with Facebook Messenger. It can be caused by a small software issue or a connectivity one. It may also be a good idea to check if your friends have blocked you. If they have marked your messages as Spam, you may not be able to send or receive messages on the app.

Facebook Messenger Won’t Open


Then there are times when you try to open the app and it crashes or doesn’t open as it should. In this case, the problem could be caused by a virus or some other software issue. It is also quite easy to fix since most of the time all you have to do is update the App or delete it and re-install it.

Facebook Messenger Crashes after iOS Update


An iOS update has been known to interfere with certain functions of your iPhone. There are some users who have reported that the Facebook Messenger crashed immediately after an update. In this case, a software bug may be to blame and Apple more often than not offers an update that will fix the app or any other issues you may be having after the update.

Real Fixes for Facebook Messenger not Working Issues


Whatever the issue you are having with Facebook Messenger, the following are just some of the things you can do to fix it.

1. Restart the App


This can be a great way to fix the Facebook Messenger app if it is frozen or unresponsive. Here’s how to restart the app.


Step 1: Double tap on the home button to open the list of recently used apps.


Step 2: Find Facebook Messenger and then swipe up to close it.


Now reopen the app and see if it works.

2. Update or Reinstall the App


If the app is still unresponsive, you may need to update or reinstall. To update the app go to the App store and locate the Facebook Messenger app to see if there is an update. Proceed to update the app and it should work just fine.


If there is no update, consider reinstalling the app completely. To do that, find the Facebook Messenger icon on your home screen. Tap and hold the app until it jiggles and an “X” shows up. Tap on the “X” to delete it. Now go to the App store to reinstall it.


3. Restart the iPhone


A restart of your device is always a good idea when you are facing any problems with it including Facebook Messenger issues. To restart the device press and hold the power button or both right and left Side buttons on the iPhone X until you see a slider appear. Slide to turn off the device. Turn on the device and then try the Facebook Messenger app again.


iPhone 8/8 plus and iPhone X


Press and quickly release the Volume Up button. Then press and quickly release the Volume down button. Finally press the Side button until the device gets into recovery mode.


iPhone 7/7Plus


Press and hold both the Volume Down and Side buttons until you see the recovery mode screen.


iPhone 6s or earlier


Press and hold the Home and Power button at the same time. Keep holding them until you see the recovery mode screen.


4. Reset Network Settings


Since most of the issues you may experience with Facebook Messenger may be network related, it is a good idea to reset the network settings. To do that, follow these simple steps; If you can’t sync with iTunes and want to rescue data from a disable iPhone, you could try Gihosoft iPhone Data Recovery. Also feel free to ask questions on the iDevice is disabled error in the comments section below.


Step 1: Open the settings app on your iPhone and then tap on General.


Step 2: Tap on “Reset.”
For now, check:Free iTunes/iPhone Backup Extractor for iPhone, iPad


Jihosoft iTunes Backup Extractor is a powerful tool to recover and extract important data from iPhone, iPad & iPod touch backup on Windows or Mac.

Jihosoft Android Data Recovery: the best Android Data Recovery software for Windows and Mac to recover deleted contacts, messages, photos, videos, WhatsApp and etc from Android devices.

Step 3: Tap on Reset Network Settings and then confirm it.


l Fixes for Facebook Messenger Not Working on iPhone/iPad (iOS 12 Supported)


Sponsor Ads:

Jihosoft Android Data Recovery: the best Android Data Recovery software for Windows and Mac to recover deleted contacts, messages, photos, videos, WhatsApp and etc from Android devices.

Clean Up Your Inbox’s Act With This Highly-Rated App [Deals Hub]

Are you inundated with emails the second you wake up? Wishing you could get your account under control? There’s an app for that! Clean Email...