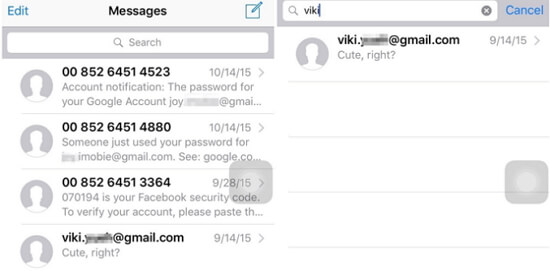
1. Look up Old Text Messages using Search Bar on iMessages
You can also very easily find old messages on the iPhone by using the search bar on iMessages. The following step by step guide will show you how:
Step 1: Tap on the Message app to open it on the iPhone
Step 2: With the messages list showing, swipe down with your finger to expose the search box.
Step 3: Type in the search term to locate the messages you need to find and the results will begin populating as you type.
Step 4: Click on the relevant search result to go to that particular message.
2. Use Spotlight to Find Old iMessages/ Text Messages
You can also easily use Spotlight search to locate any old messages you may need. The following is how to do it:
Step 1: Tap and swipe to the right from the home screen to bring up Spotlight search.
Step 2: Tap on the search bar and begin typing in any keywords that may be relevant to the messages you are looking for. For example, you can type in the name of the sender, a word in the message or even a phone number.
Step 3: When the search results appear, scroll down to locate the messages section to find the old messages you need.
Jihosoft Android Data Recovery: the best Android Data Recovery software for Windows and Mac to recover deleted contacts, messages, photos, videos, WhatsApp and etc from Android devices.
If there’s one thing we do with our Android phones on a daily basis, it’s probably taking photos and sharing them on social media. Whether or not you’re a selfie addict, you’re bound to have at least one photo-sharing app installed in your phone.
What we don’t know is that there are dozens of photo sharing apps in the Google Play Store. It’s fascinating how versatile (and fun) sharing photos can be with these apps. From taking funny selfies to breath-taking nature shots, there’s an app for that.
That’s exactly what this list is all about. If you’re looking for new ways to share your snaps and get noticed, then read on to see a list of the best photo sharing apps for Android today.
1. Instagram
As of June 2018, Instagram has reached 1 billion active users per month. Just from this information alone, it’s safe to say that this photo-sharing app is perhaps the most popular one of all.
With its simple interface, beautiful filters, and a massive social following, Instagram is the ultimate app for photo sharing. Not only do you get to edit and share your photos, but you also get to follow friends, family, celebrities, and even total strangers and see their latest photos.
If, for some odd reason, you don’t have this installed yet, do yourself a favor and get on the bandwagon. You don’t want to miss out on your friends’ latest vacation or what Kim Kardashian had for lunch.
Moments by Facebook is a private photo sharing app. This is great if you want to share photos with family members only, but not your friends.
In addition to setting your photos as private, the app can act as an alternative to your phone’s gallery. Moments enables you to sort and organize your photos, view them in full resolution, make slideshows, and share them using Facebook.
3. VSCO
Known for its quality filters, VSCO proves to be a great photo sharing app. Touch up or transform your photos into stunning works of art with professional-quality presets.
Want to share your snaps with other VSCO users? Sign up to join the network and connect with a community of photography geeks like yourself. It’s not as huge as Instagram, but it’s still a great way to find people with a common interest.
4. Snapchat
If there’s a photo sharing app with a bit of personality, it’s Snapchat. This app is famous for its live filters that can transform your face into a cute dog or a scary witch. Who would have thought that even adults would find this fun?
Anything you post in Snapchat (called Stories) have a 24-hour expiration. They can be viewed as many times within the 24-hour window, but when that time is up, the post is automatically deleted. How’s that for living in the moment?
Snapseed is a serious photographer’s app. While it’s great for sharing photos, its best features are really in its photo editing capabilities. If you want to enhance photos like a pro, then this app is for you.
Snapseed has the basic photo editing functions (filters, crop, adjust properties) as well as advanced ones (levels, white balance, RAW editing.) So it has something for the novice and advanced user.
6. B612
For women (or girls) who like to always look good in their selfies, try B612. With beauty-enhancing filters, you’re sure that your picture is share-worthy.
Just like Snapchat, B612 also has 50 different filters, some of them also transform your face into interesting characters. If that’s not enough, you can add stickers or turn yourself into an emoji.
There’s nothing like old photos to spark great memories otherwise long forgotten. Timehop is a cool photo sharing app when you’re in the mood for Throwback Thursday (or Wayback Wednesday.)
There’s also a nifty feature that can do a “before and after” photo of you within a specific time period. When you’re ready to share your memories, you can post these precious moments straight to Instagram, Facebook, or Twitter.
8. PhotoGrid
Sometimes one photo is not enough. For sharing multiple photos, you’ll need to create a collage. For this, PhotoGrid does the job really well. There are lots of collage-making apps in the Play Store, but PhotoGrid has been the one with the best reviews.
Creating collages is easy with this app. Simply select photos from your gallery and let the app create the collage for you, or you can do it your own way. Embellish your collage graphic elements like frames, stickers, and emojis.
Other editing features include background eraser, retouch, AR camera, and creating Instagram stories.
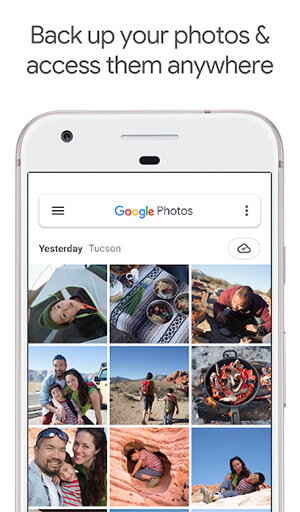
9. Google Photos
For the Google-dependent user, this photo-sharing app is a great addition to the Google suite of apps. Google Photos creates a backup of photos in your phone so you don’t have to worry about running out of space or accidentally deleting photos.
You can backup unlimited photos in the cloud for free — which is a great deal. But that’s not all Google Photos can do. You can automagically create movies, collages, and animations from your photos. You can also use its editing tools which include 14 photo filters and options for lighting, contrast, color, and vignette.
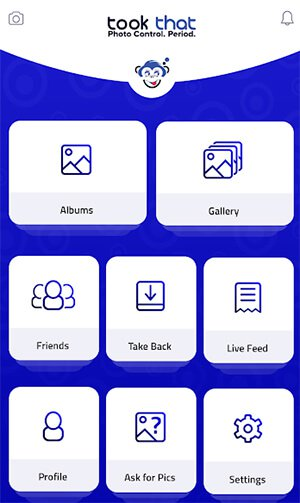
10. Took That
Not everyone has to see your photos, especially if they’re something you want to keep private. That’s why this genius idea for a photo sharing app is a game-changer.
Took That is not just a private photo sharing app. Yes, you can limit who can view your photos, but Took That also provides the option for you to “take back” your shared photo. If enabled, photos you shared with your private network will disappear after a certain period of time.
Have you ever used any of those apps and falsely lost your photos? Don’t feel sorry for that, and start downloading Gihosoft Free Android Data Recovery software now to recover deleted photos, and retrieve your best moments made with those best photo sharing apps on Android.
In this post, we have hand-picked 6 amazing manual camera apps for Android. These apps put DSLR like manual controls at your fingertips.
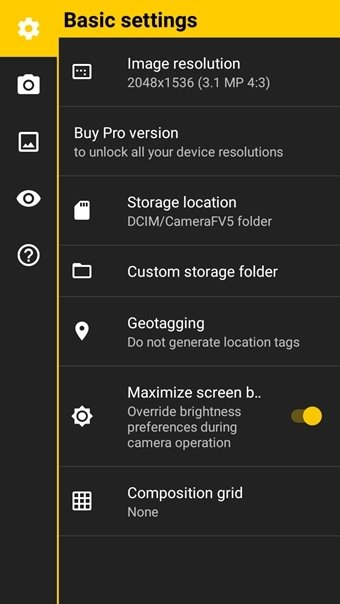
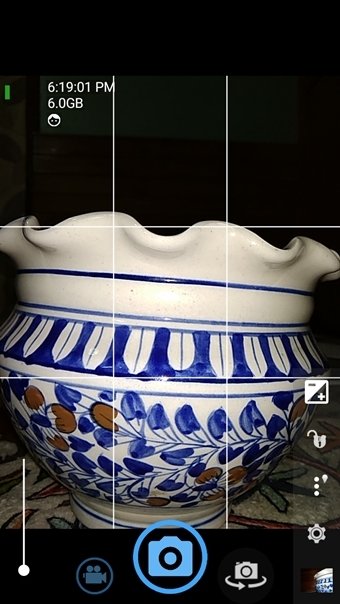
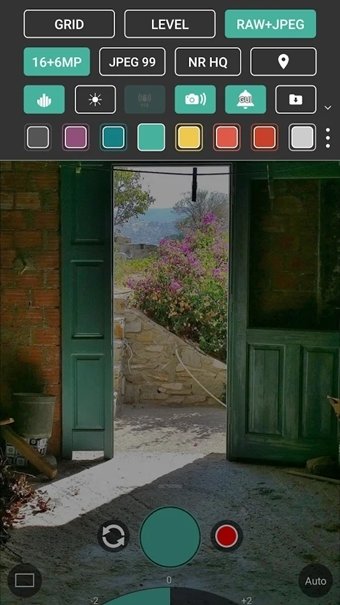
1. CAMERA FV-5 LITE
If you are familiar with the DSLR settings, the Camera FV-5 Lite app provides a similar user interface (UI). You get all the necessary options on the first screen itself. Nothing is buried down in the settings.
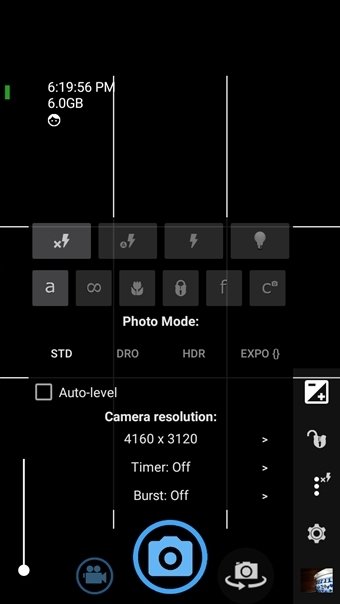
With this app, you can control ISO, light metering mode, focus mode, and white balance. You can also create time lapses and time-controlled picture series. In addition to program and speed-priority modes, you can also set manual shutter speed and view live histogram.
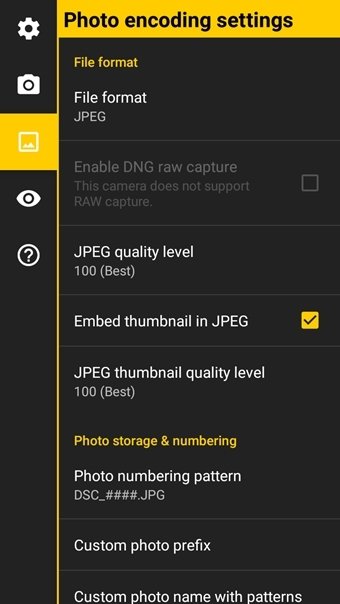
The app also supports EXIF and XMP metadata. Further, you also get multiple focus modes like Autofocus, macro, touch-to-focus, and infinity focus modes. When it comes to quality, you can change the JPG compression quality and also save lossless PNG images.
If you want to assign camera functions to volume keys, the app also lets you do the same. When it comes to organization, the app makes sure you get all the things such as customizable file names, storage locations, file format etc.
ALSO READ:6 Best PicsArt Alternatives for Android
Although you get all these features in the free app, the Lite version limits the resolution to 3.1MP. To unlock all the device resolutions and to enable RAW capture, you need to buy the premium variant that costs $3.
Open Camera includes all the manual camera controls. It is an open source app where you get all the features for free. There are no in-app purchases or ads.
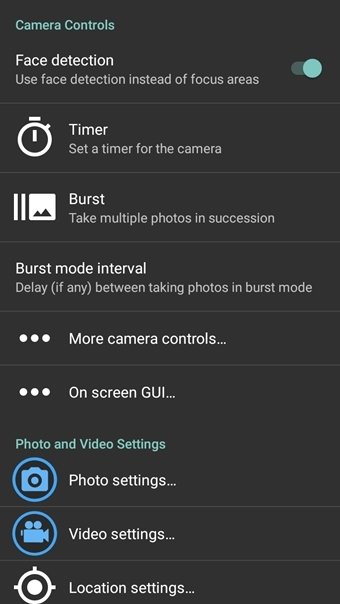
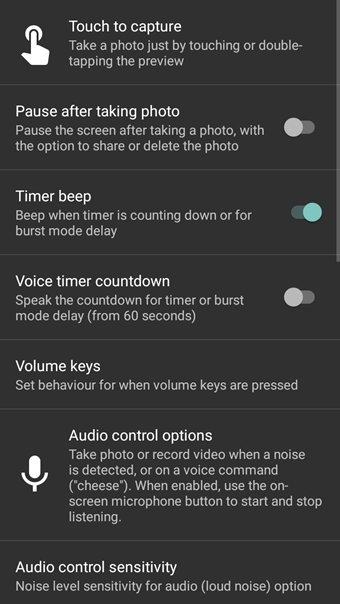
Open Camera offers almost all the Camera FV-5 Lite features. You get the basic controls like white balance, ISO, exposure compensation/lock, scene modes etc. Interestingly, you also get face detection.
Further, the app offers cool ways to capture photos such as by a voice command or some other sound such as a whistle. Similar to the FV-5 Lite app, you get configurable volume keys and the ability to choose where to save the images.
You can also add other things to your images like date, timestamp, and location coordinates. The app also supports timer, burst mode, HDR, and a widget that lets you take a photo with a single tap.
Unlike the other two apps, Footej Camera doesn’t provide too many manual controls. But, whatever it offers is present in a clean UI. However, to get that neat look, all the manual options are present under the three-dot menu icon making the process a bit longer.
Footej Camera supports exposure, timer, grids, multiple photos, and scenes. You can also create GIFs and slow-motion videos. In addition to that, the app also supports the RAW format and the ability to take a snapshot during video recording.
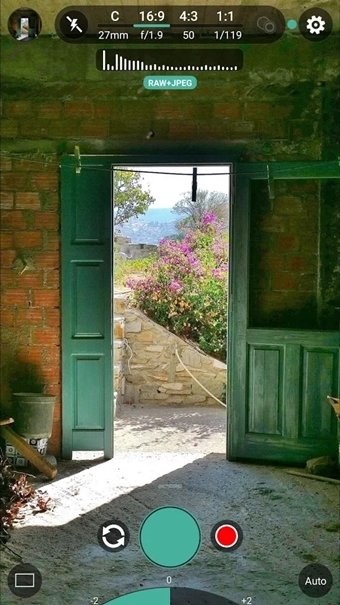
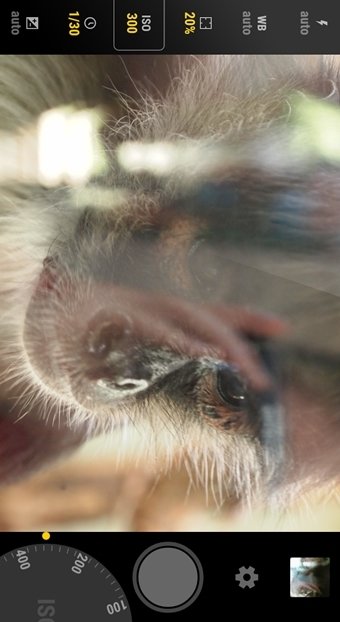
If you are willing to pay some bucks, $3.84 to be precise, ProShot is a good choice. It offers extremely cool manual features making you feel like you are actually using a DSLR camera. Other than the usual controls like ISO, shutter speed, white balance, scenes, the app also offers the ability to shoot in RAW.
You can even choose resolution and aspect ratio modes. Along with the live histogram feature, the app also comes with a Light Painting mode with infinite shutter and live preview.
In addition to that, you also get JPEG quality control, noise reduction and manual focus assist in this app.
Download ProShot
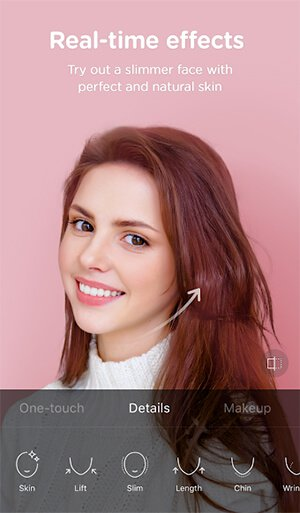
5. CAMERA360: SELFIE PHOTO EDITOR WITH FUNNY STICKER
If you are looking for a manual camera for your front camera or for taking cool selfies, then Camera360 is the answer. You can apply live filters and effects to your photos using this app. Trust me, the Camera360 app contains a wide variety of effects and filters.
With this app, you can basically create a new person, thanks to the cool editing. You can change your eye size, whiten the teeth, and enhance your lips with this app. And once you are done, you can even add stickers.
Another paid app that provides superb manual control goes by the name Manual Camera (how convenient). It supports shutter speed, ISO, white balance, exposure compensation, and focus distance.
Not all devices support manual controls. Since it is a paid app, the developer wants you to run a compatibility test. You can download the app to check compatibility here.
To make changes, the app provides a rotating wheel, where you can adjust various settings. Like most of the other manual camera apps, it also supports the RAW format. You can even adjust grids, sounds, and timer.
Data loss can strike at any time and comes in a variety of forms, such as accidental or malicious deletion, factory resetting restoration, device rooting, system upgrade failure, virus attack, battery replacement, physical damage, etc. However, the most common cause of data loss is human error. You know that feeling when you realize you’ve mistakenly deleted something that really important from your Android phone or tablet, it could be a photo, text message or even a contact.
Actually, you do not need to worry about this. When your data is lost or deleted from your Android phone, they do not really disappear and still exist, you can get them back before they are overwritten. As for how to recover deleted data from Android, you may refer to the following instructions.
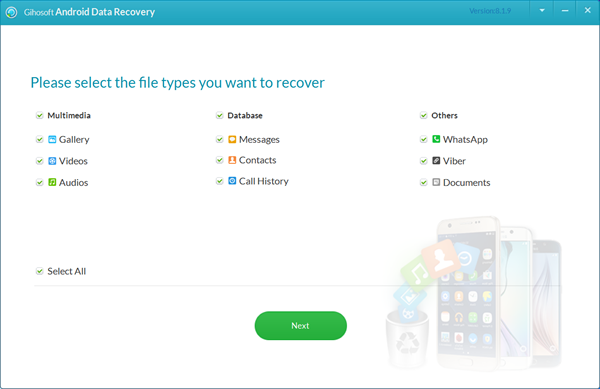
Gihosoft Free Android Data Recovery is a professional Android file recovery software that enables you to recover deleted photos, music, videos, messages, contacts, call history, WhatsApp, Viber and more from Samsung, Huawei, LG, HTC, Motorola, Google, Oneplus, Sony, Lenovo, ZTE and other Android devices directly. Just refer to the following steps to find out how to recover deleted files from Android via Gihosoft Android Data Recovery Free.
Step 1. Run Gihosoft Android Data Recovery
Download and install the latest version of Android Data Recovery Software on your computer, then run it to select the file types you want to recover.
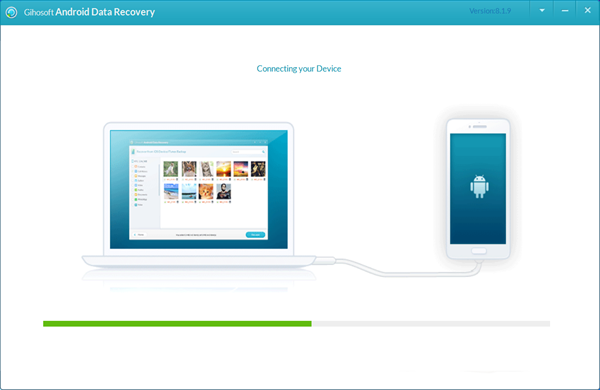
Step 2. Connect Android Phone to Computer
Enable USB debugging on your phone and connect Android to PC via a USB cable. Then tap Allow or Ok on your phone’s screen to authorize the program. Once connected, tap the Start button and wait for our program to scan lost data on Android.
Step 3. Recover Deleted Files from Android
It will take a while to scan the lost files. Once completed, You can go to the specific category to preview them and check the one you wish to recover, then click the Recover button to recover deleted files from Android.
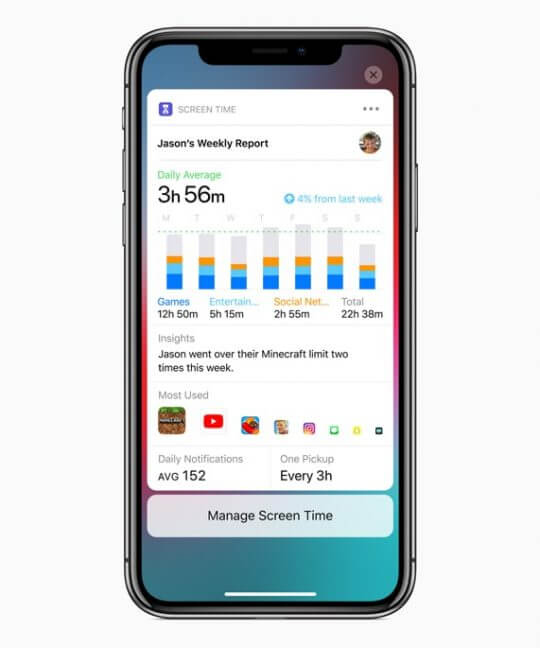
As we mentioned above, Screen Time is a part of a new digital wellness program from Apple. The idea is to keep you from spending too much time on your device and to get you back to experiencing life.
If you end up finding that you are using apps like Facebook, YouTube or Twitter too much, you can actually set time limits.
To find the Screen Time information, here are the steps:
1. Open Settings on your iPhone
2. Scroll down and select Screen Time
From here, Apple shows you a breakdown of which types of apps you frequently and regularly use. Then, there are options for Downtime, App Limits, Always Allowed, and Content & Privacy Restrictions.
You can even set up a Screen Time passcode which will allow you to use apps even after the limits expire. Additionally, you can set up Screen Time for Family, which will provide time reports for how much your child is using different apps.
Family Screen Time Issues
It seems that there are quite a few issues for those who are trying to take advantage of Family Screen Time. In one instance, the parent had to replace the child’s iPhone but none of the information transferred to the new device.
Instead, the old iPhone is still listed alongside the new iPhone but is set as the default. To bypass this issue and get the right devices listed, the first step you’ll want to take is to register it under the correct Apple ID.
Then, if that doesn’t work, follow these steps:
1. Open Settings
2. Tap on the Apple ID at the top
3. Scroll all the way to the bottom to view devices
4. Delete the old iPhone if it is no longer in use
For some reason, it doesn’t seem like Apple has fixed the issue in the latest iOS 12.1 beta. Instead, users are still running into the same problems with Screen Time.
If you are having issues with Screentime and Family Sharing, we have written a comprehensive guide that walks you through the setup and addresses some of the common issues such as gray screen on screen time, understanding parents vs adults rights and other issues.
In that case, use the included Feedback app to submit your issue to Apple. Hopefully, a workaround will be on the way in a future release.
Get children’s info to show up properly
Another issue that seems to be plaguing parents is that the data iOS shares across devices are not 100% accurate. There are reports that the name of devices are not correctly matching up and are sharing the wrong information.
One fix for this is to reset Screen Time completely on all devices. Make sure you update your devices to the latest version of iOS.
After you follow those two steps, then you will have to follow the process for setting Screen Time up again. This repetition can be a tedious process, but doing so should work out any of the kinks that are plaguing Screen Time.
Finally, one user claimed that you should toggle on ‘share across devices.’ This feature helps ensure that the proper information shares without providing incorrect data.
There are some well-documented ways that kids can cheat through Screentime. One popular method is to send a youtube link to iMessage and then watch the video inside the message. Guess there’s always a way out!
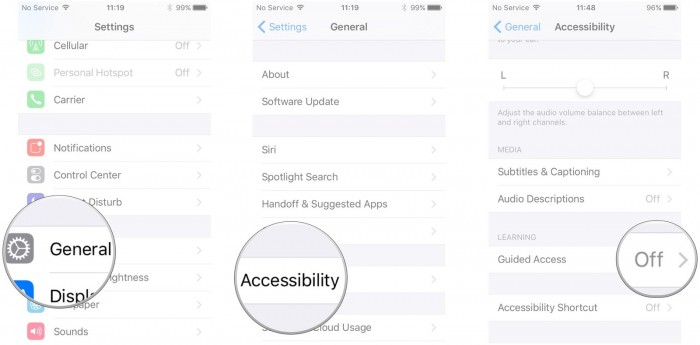
iPhone Guided Access feature is an accessibility feature that disables all gestures, taps, button presses and any other activity on your iPhone outside those required for your current app. In other words, it allows access to a single app. If your child tries to leave the permitted app and try opening other apps or going to a different part of the iPhone, he or she will be stopped. If they try to click the Home button, they will be required to enter a four-digit code in order to disable the Guided Access feature.
How to use Guided Access on iPhone?
Guided Access can also be used to set up a guest mode on your iPhone. This means that with this feature enabled you can easily hand over your device to someone else to use it without worrying about them snooping through your personal information and files.
How to Turn On Guided Access on iPhone?
Step 1: Open the Settings app on your iPhone.
Step 2: Tap on General > Accessibility.
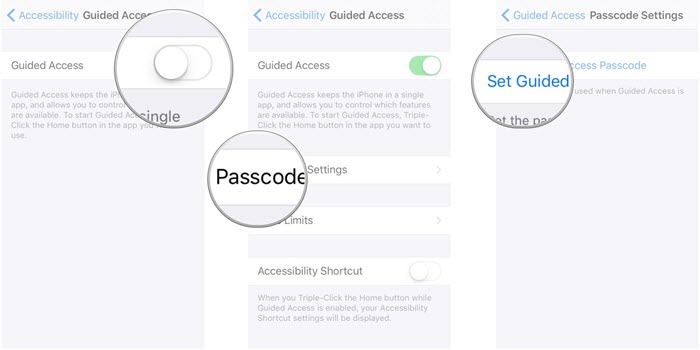
Step 3: Click on Guided Access found under the Learning section on your iPhone. Tap on the toggle switch to enable the Guided Access.
Step 4: Click on the Passcode Settings.
Step 5: Touch on the Set Guided Access Passcode option and then set your passcode.
Step 6: Enable the Accessibility Shortcut by toggling the switch to On. This allows you to triple-click the Home button and then enter the Guided Access whenever you want.
How to enable Touch ID for Guided Access?
iPhone’s Touch ID feature lets you access your device without the need of entering the passcode. All you have to do is to is place your authenticated finger and the iPhone unlocks itself. If you are using this feature to unlock your device, you can also use it for Guided Access. It is ideal for those parents with clever kids who can memorize your passcode.Ads:
If you lost data after you updated to a new iPhone, you can always use Gihosoft iPhone Data Recovery to get the data back from the old iPhone or backup.
Step 1: Open the Settings >General > Accessibility > Guided Access > Passcode Settings
Step 2: Tap on the Switch that is next to the Touch ID to activate it.
How to Start Guided Access on iPhone?
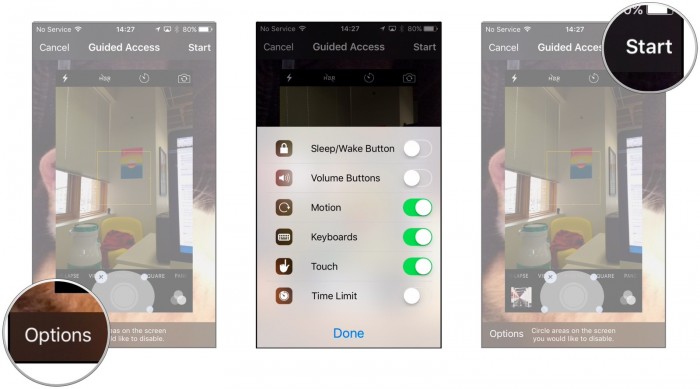
For you to start using the Guided Access feature, you need to launch it. After enabling this feature, you can then start using it. Here are steps on how to use this iPhone feature:
Step 1: Launch the app that you would like your child or any other user to have access to. If it is a game or an app, launch it first.
Step 2: Triple-click the Home button on your device to launch the Guided Access feature.
Step 3: Circle any areas or apps on the screen that you would wish to deny access to.
Step 4: Touch on the Options in the bottom left corner of the screen to choose whether you want to grant access to other features like the Sleep/Wake button, touch screen feature, motion sensor, and Volume buttons. Once you have made the selection, tap on Done to save.
Step 5: Touch on the Start button at the top of your screen to begin the Guided Access.
How to Turn off Guided Access on iPhone?
You can decide to end the Guided Access at any time. However, for you to be able to do so, you will have to follow these steps:
Step 1: Triple-click the Home button or the Side button
Step 2: Enter your Guided Access passcode
Step 3: Tap on the End option to stop the Guided Access.
Options of Guided Access
Sleep/Wake button: Toggle off the Sleep/Wake button to prevent your kids accidentally pressing the button to lock the screen.
Volume button: When setting up the Guided Access feature, you can choose to toggle off the volume button and this will prevent other users from increasing the volume of the device.
Motion: Switch off the Motion feature of your device and the screen will not respond to the gyro sensor feature of the iPhone. However, if your kids are playing motion games do not toggle this feature off.
Keyboards: Toggle of the keyboards and prevent access to the keyboard when using the locked app.
Touch: When you toggle off the Touch feature, this will prevent the touchscreen from responding to any activity on the screen.
Dictionary Lookup: Once the Dictionary Lookup feature is toggled off, no one will be able to use this feature to find dictionary meanings of certain words.
Time Limit: You can also decide to toggle off the Time Limit feature that is set for the Guided Access feature. No one will be able to change this limit no matter what unless they have the passcode to your device.
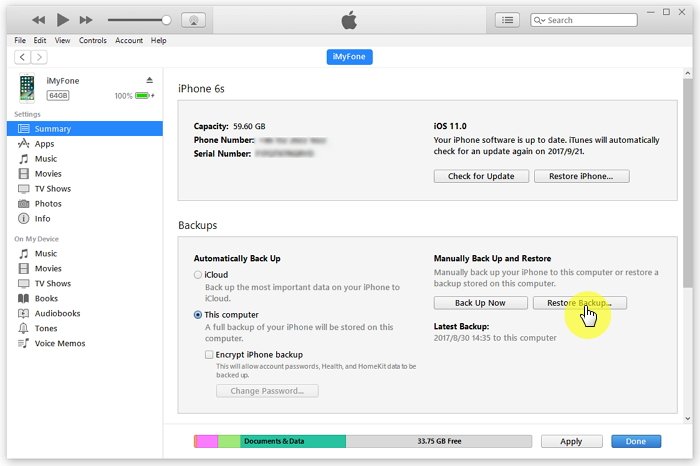
1 iPhone XS/XS Max/XR Recovery by iTunes Restoration
Launch iTunes on the computer you are using (Mac or PC) to backup the data of your iOS device. Then, connect the device into the same computer through the original USB cable. If prompted to provide a passcode or trust the connected computer, please follow the instructions displayed on screen.
Then, select the iOS device you are using once it is appeared on your iTunes.
Now, you should select the option called Restore Backup in iTunes.
You can now select the most relevant backup from the list after considering the data and size.
Click on “Restore” and wait for the process to be completed. If prompted, provide the password to decrypt the iTunes backup. Don’t disconnect your device in the restore process. ads:
If you lost data after you updated to a new iPhone, you can always use Gihosoft iPhone Data Recovery to get the data back from the old iPhone or backup.
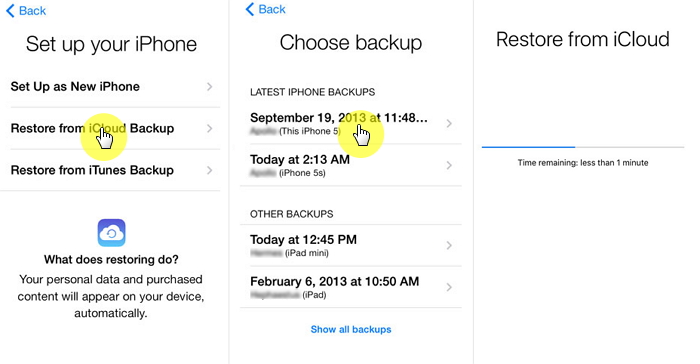
2: iPhone XS/XS Max/XR Recovery by iCloud Restoration
Turn the device on and you will see the welcome screen. If the device is already configured, you will have to erase the data it contains before proceeding to the next step.
Carefully follow the onscreen setup to see Apps & Data screen. Choose tap Restore from iCloud backup.
You can now select a backup which you will restore. You can go through the information like data and size of the available backups and decide the most relevant one for you. After selecting the best backup, the transferring process will begin.
Provide the credentials and log into your Apple ID when prompted. That will allow you to restore what you have already purchased under the respective account. Wait for a while and stay connected.
Finish the setup process and you can now use the device without any trouble. Data like photos, apps, music etc. will get restored in the background. The duration of this process may vary depending on the amount of data. So, it is best to keep your device connected to Wi-Fi until the restoration is completed.
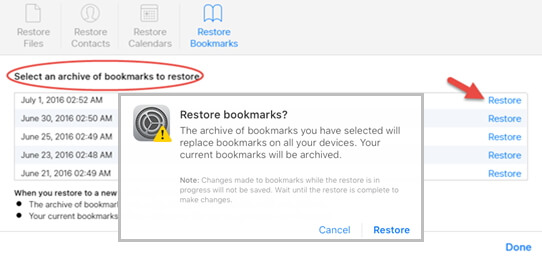
3: iPhone XS/XS Max/XR Recovery from iCloud.com
This method only works on files, contacts, calendar, bookmarks. Here we will take bookmarks as example.
Go to iCloud.com and sign in and go to the Settings option.
Scroll down on the screen and click on the option “Restore Bookmaarks”. This option can be found under “Advanced” option.
Now, click on the Restore button.
Confirm the restoration process simply by clicking on the Restore button once again.
At the completion of the above step, you should get a notification on iCloud.com. An email will be sent the Apple ID of yours.
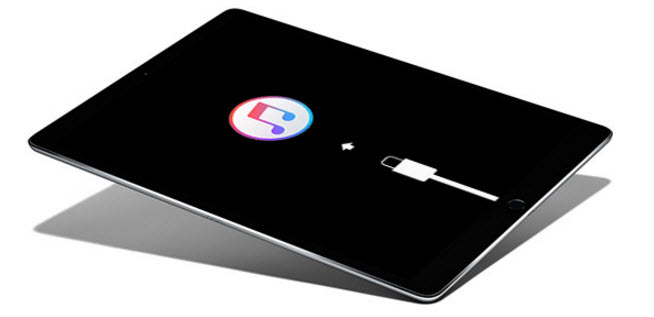
Having an iPhone stuck in recovery mode isn't uncommon and there are a few reasons for this problem arising.
Software or hardware problems.
iOS update stuck for hours.
Installing beta iOS versions.
iPhone stuck on Apple logo loading screen.
These are just a few examples but don't worry, it can be fixed.
2 Will I Lose Data If My iPhone Stuck in Recovery Mode?
First of all, we would sadly inform you that you won't be able to backup your iPhone anymore for the reason that your iPhone is in recovery mode, but if you can get your iPhone out of recovery mode without restoring iPhone, you will not lose data. We are going to introduce some easy ways to get your device out of recovery mode without the need of iTunes restore. If you will be lucky enough to get your iPhone out of recovery mode with the help of the following solutions, you can easily get your data back. However, in case, you won't come up to the results, you are likely to lose all your data.
3 3 Ways to Get iPhone out of Recovery Mode without Losing Data 3.3. Usual Steps to Exit iPhone Recovery Mode
Sometimes you may find that your iPhone will be stuck in recovery mode. Now, if you are wondering what are the possible steps which can help you get out of the mess and resume the normal working of the phone, here are the steps to exit the recovery mode under normal circumstances.
Hold down and press the Home and Power button for about 15 seconds, this will shut off the iPhone.
Keep holding the buttons to boot the iPhone. This should bring your iPhone out of the recovery mode.
Note: If you are using iPhone 7, press Volume Down button instead of Home button. If you are using iPhone 8 or later, quick press Volume Up button and then Volume Down button, then keep hold Power button until your iPhone restarts.ads:
If you lost data after you updated to a new iPhone, you can always use Gihosoft iPhone Data Recovery to get the data back from the old iPhone or backup.
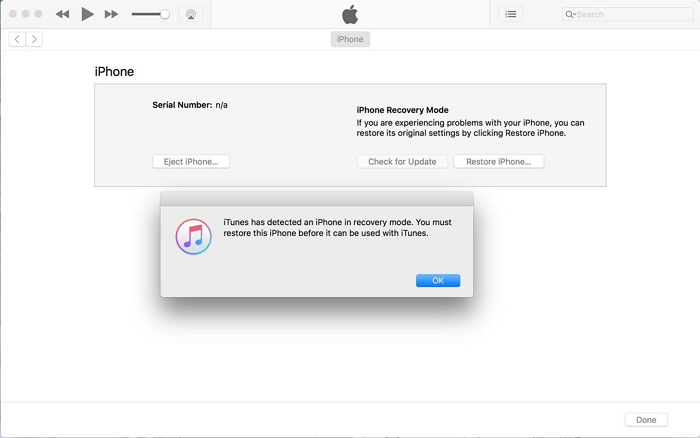
If the above method doesn't work, try the following steps to get iPhone out of Recovery mode with the help of iTunes. Please note that your iPhone will be erased and all the data on your device will be lost.
Here is the iTunes solution to fix iPhone stuck in recovery mode.
Open iTunes and if prompted, download the most recent version. You can check if iTunes is up to date by clicking "Help > Check for Updates". If your iTunes is outdated, then the newer version will be downloaded automatically.
Connect your iPhone with your computer
iTunes will show a notification explaining that it has detected your iPhone in recovery mode. You will be required to restore your iPhone. After restoring your iPhone, it will probably get out of recovery mode and work normally as before.
5 Use DFU Mode to Get iPhone out of Recovery Mode (Erase iPhone)
DFU (Device Firmware Update) Mode is the deepest restore mode that can be used on an iPhone, or any iOS device for that matter. In comparison to some of the other solutions you find online, a DFU restore is more likely to be the final fix for iOS problems. It will completely erase everything on your iPhone and make it just like a new iPhone.
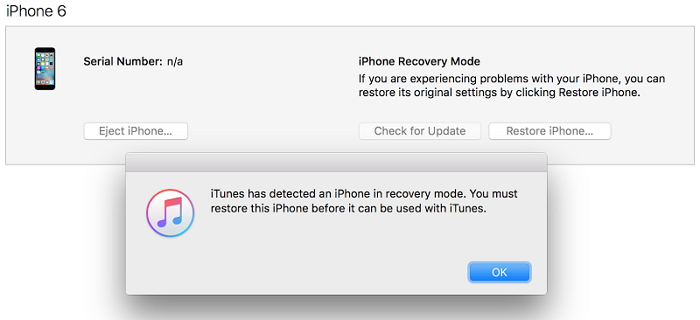
Launch iTunes and connect your iPhone. For iPhone 6S and earlier, hold the "Sleep/Wake" and "Home" buttons simultaneously for about 8 seconds. For iPhone 7 and later, hold the "Sleep/Wake" and "Volume Down" buttons instead, again for 8 seconds.
After the 8 seconds is over, let go of the "Sleep/Wake" button but continue holding the "Home" or "Volume Down" buttons, depending on your iPhone. Do this until the "iTunes has detected an iPhone in recovery mode" notification is shown. You will find your iPhone screen is black. Then your iPhone has entered DFU mode. For iPhone 8 and iPhone X, please check this guide.
Release all of the buttons now. Click Restore iPhone and get your iPhone back to factory settings.
If you are planning to learn a car, then you need not wait any more because here are best car learning apps for android. These apps specifically help the users in learning how to drive as well as make them aware of all the basic rules associated with driving.
Top 8 Best Car Learning Apps for Android
When these applications can teach you every lesson for driving a car including driving rules, traffic rules, controls, indicators, lights info, and everything, then do you think that there is any need to run to driving school? You can simply download the best app on your android and start learning how to drive a car. Now, the main challenge lies in choosing the best car learning apps for Android because there are numerous apps available which makes it little difficult to choose the best one. If you are planning to learn a car, then you need not wait any more because here are best car learning apps for android. These apps specifically help the users in learning how to drive as well as make them aware of all the basic rules associated with driving.
Here are Best Car Learning Apps for Android
#1 Learn Car Driving Theory
This particular android app covers everything associated with the car driving lessons as well as teaches drivers all the topics associated with car driving. It does features really good driving lessons with a complete driving guide. Overall, it is one of the best car learning apps for android.
#2 Driving Edge Car Driving License
This car leaning app for android basically focuses on the safety tips which should be followed during driving. It is the best app to use for those who are preparing for a License test. It really doesn’t bother with any ads and even explains the differences between the vehicles.
#3 BC Driving Tests- ICBC Exam
This is the best car learning app for the beginners to learn about the driving lessons. It does feature a Learn to Drive smart guide as well as include 200 questions for the test. This is one of the best apps to learn car driving.
#4 Driver License Test
This app is specifically designed for USA drivers. It features questions along with driving videos including YouTube Videos. It is the best-suited car learning app for beginners.
#5 Dr. Driving
Burn up the street with the fastest and most visually stunning driving game. Sign in with your Google account to play online multiplayer. You can get free gold when you finish the mission before opponent in multiplayer. So, its another best learn car driving app which you can use.
#6 Learn How To Drive: Manual Car
Learn How To Drive: Manual Car is one of the best apps which you can use to learn car driving. The app covers almost everything to guide a beginner to drive a manual car. The best thing about Learn How To Drive: Manual Car is that it offers guides which are easy to follow. You can use the app to learn the basic steps of driving a car.
#7 Driving Academy
Driving Academy is another best Android app which you can use to learn car driving. Basically, it’s a car school driver simulator which can help you to master your driving and parking skills. Not just that, but Driving Academy also covers some road rules which you need to follow while driving a car. So, it’s another best app which you can use to learn car driving.
#8 Car Driving School Simulator
Well, if you want to kick start your goal to learn car driving, then Car Driving School Simulator could be the perfect app to go with. The app provides users with the most realistic way to learn car driving. Basically, Car Driving School Simulator is a game which can help you to master your skills in controlling a car. So, the Car Driving School Simulator is the best learn to drive simulator Android app which you can use to learn how to drive.
These are the best car learning apps for android which are recommended to those who want to learn car driving but can’t spend much of their time to run to a driving school. If you have your personal favorite car learning app for android, discuss in below comments.
Erase unwanted objects and perfect your amazing photos!
Remove objects from photos with Photo Eraser is almost as easy as taking a shot. Now you can use this tool to erase undesirable objects from your pictures, such as tourists, watermarks, logos, texts, blemishes and other unwanted things without real photo-editing skills required at all.
The most powerful and professional data recovery software for Android that can restore deleted or lost contacts, photos, videos, audios, SMS, call logs, WhatsApp chat, Viber messages from any Android devices due to accidental deletion, virus attack, formatting. It supports all popular Android smartphones and tablets like Samsung, HTC, LG, Huawei, Motorola, Nexus, etc. In the meantime, you will be guided step by step if you never used this kind of tool before.