Sunday 29 July 2018

How to Fix My Photo Stream Option Missing or Not Available


How to Fix My Photo Stream Option Missing or Not Available


Before getting started, I want to let you know a thing. According to the Apple


If you recently created your Apple ID, My Photo Stream might not be available. Use iCloud Photo Library to keep your photos and videos in iCloud.


So, If you are a new user, this feature may not be available for you temporarily. Still, You can follow these solutions to see if it brings the luck.
1. Remove the Restriction


If you got a supervised iPhone or iPad from your organization, the photo stream feature might not be available. Because Your organization may have disabled this feature. In this case, You can do the following things.


Image Source: Apple


First of all, You can go to Settings > General > Profiles & Device Management.


Now, Remove the profile and restart your Apple device.


If you can’t do the above procedure, You may have very little things to do. You can request the administrator to have the photostream feature.
2. Enable iCloud Photo Library


It’s weird but if you enable iCloud photo library, it may bring the photostream feature. I have no idea about it. But, I have seen this suggestion on various forums. To do it, follow these things.


At first, Go to Settings.


Then, Tap on your Apple ID (Profile).


Now, Go to iCloud > Photos and tweak the switch next to the iCloud Photo Library to enable it.


3. Login with Different (Probably Old) Apple ID or Login into an Old iOS Device


This is another weird solution. As this problem is mainly encountered by the new Apple users with new Apple ID, you can use a different and old Apple ID and see if it helps. According to some random sources, “If someone has a new Apple ID and login into an iOS 11.2 or later device, photo stream feature may not be available for him/her.” In this can, you can login into an old iPhone or iPad and you may get the My Photo Stream. Once you have got this feature, you can login into the new device.iPhone backup extractor free:The best iPhone Backup Extractor software to extract photos, text messages, contacts, voice memos, note, WhatsApp, Viber and etc from iPhone/iPad backup.


Thursday 26 July 2018

How to Downgrade from an iOS 12 Beta to iOS 11

How to Downgrade from an iOS 12 Beta to iOS 11


If you do not have backups from iOS 11, it is possible that you do not have many options if you are overwhelmed by the demotion to the old software.


If you continue to put your device into recovery mode and restore iOS 11, you will lose some of your non-native data and applications.


You will probably be able to save data to iCloud, including iMessages, contacts, calendars, notes and other data. Likewise, if you have set up the iCloud Photo Library, your photos and videos will already be stored in the cloud.


Overall, if the demotion to iOS 11, but the loss of your data is worth it is entirely up to you. But if you decide to go ahead, be sure to check these iCloud data sync settings so you do not lose everything.
Restore iOS 11 with an archived iTunes backup


Connect your iOS device to a Mac or PC with iTunes installed on it. When iTunes opens, click on the icon of your device.At this point, it is strongly recommended that you back up your device to iTunes before continuing.


Put your device in recovery mode. This varies depending on the type of iOS device you have.> For the iPhone X, the iPhone 8 or the iPhone 8 Plus, press Volume Up, press Volume down, so what hold the side button until Recovery mode appears.> For the iPhone 7 or the iPhone 7 Plus, hold the Standby / wake up and low volumesimultaneously until Recovery mode appears.


> For iPads and iPhone 6s and earlier, hold the Home button and the Sleep / Wake button simultaneously. Do not let go until you see the Recovery mode (in other words, hold it down once the device has restarted and the Apple logo is displayed).


When your device is in recovery mode, it will automatically ask you if you want to perform an update or restore. Click on Restore. Keep in mind that this will erase all data on your iPhone. But it will also install the latest non-beta software update from iTunes.
Restore iOS 11 with only an iCloud backup


Plug your iOS device into a computer. Again, it’s probably smart to back up your device at this point.Note: ICloud backups are not backward compatible. If your iCloud backup is done after upgrading to iOS 12, we do not recommend continuing.


Put your device in recovery mode using one of the following methods.> For the iPhone X, the iPhone 8 or the iPhone 8 Plus, press Volume Up, press Volume down, so what hold the side button until Recovery mode appears.> For the iPhone 7 or the iPhone 7 Plus, hold the Standby / wake up and low volume simultaneously until Recovery mode appears.


> For iPads and iPhone 6s and earlier, hold the Home button and the Sleep / Wake button simultaneously. Do not let go until you see the Recovery mode (in other words, hold it down once the device has restarted and the Apple logo is displayed).


When your device is in recovery mode, it will automatically ask you if you want to perform an update or restore. Click on Restore. Once the process is complete, you will have a new iPhone under iOS 11 – but without data.


Review the installation process on your iPhone When you get to the Applications and Data screen, choose to restore from an iCloud backup.Sponsor Ads:


Gihosoft Free iPhone Data Recovery is a professional iPhone Data Recovery software to get back all your lost text message, photo, video, call history, note, contact and more from iPhone/iPad/iPod Touch. It offers a full solution to recover your lost data in different tough situations. Besides recovering data directly from iPhone, iPad and iPod touch, it also allows you to recover data from iCloud and iTunes backup files.


Gihosoft Android data recovery Free is a super awesome software specialized in Android file recovery. With this program, you are able to recover deleted photos, music, videos, messages, contacts, call logs, WhatsApp messages, Viber chat history and more from Samsung, Huawei, LG, HTC, Motorola, Google, Oneplus, Sony, Lenovo, ZTE and other Android devices directly. Meanwhile, this Android data recovery software is available for both Windows and Mac platforms.


If everything goes as planned, your backup should have restored your data on your iPhone.

Wednesday 25 July 2018

How to Delete songs from iPad


How to Delete songs from iPad
Method 1: How to Delete songs from iPad using Music App

You can also delete individual songs by using the Music App on your iPad. Follow the steps given below:


Open the “Music App” on your iPad.


Click “Songs” to display all music files on your iPad.


Select the song you want to delete and tap it to play.


Click the song name after which a pop-up menu will get displayed.


Click the icon which resembles three red dots.


Select “Delete from library.”


Method 2: How to Delete songs from iPad using Settings

Through the Downloaded Music folder within the main Music Section in Settings, you can easily delete songs from iPad. There are two methods to do it:
1 Via Music Section


Open “Settings” and click the “Music” tab.


Under “Music Settings”, click the “Downloaded Music” tab.


Click the “Edit” button in the top right corner.


You’ll see a red minus sign on all the songs using which you can delete them one by one, or detele all songs at once.


2 Via Storage Section


Open “Settings,” followed by “General” and click the “Storage and iCloud Usage” tab.


Under “Storage and iCloud Usage” section, click the “Manage Store” tab.


Scroll down to find the “Music” tab.


Click the “Edit” button in the top right corner.


You’ll see a red minus sign on all the songs using which you can delete them one by one.


Now that you know several different ways to delete songs from iPad, you can liberate your iPad storage from untouched music files easily. All you need to do is follow the steps mentioned in all the sections carefully. If you lost videos from iOS Camerall Roll which are nowhere to download again, you can use Gihosoft iPhone Data Recovery to get back deleted videos from iOS device including iPhone, iPad and iPod Touch.

Jihosoft iPhone Backup Extractor Extract and recover all types of data from iPhone backup files, such as camera roll photos, videos, SMS, contacts, reminders, WhatsApp, and etc.

Gihosoft Android data recovery Free is a super awesome software specialized in Android file recovery. With this program, you are able to recover deleted photos, music, videos, messages, contacts, call logs, WhatsApp messages, Viber chat history and more from Samsung, Huawei, LG, HTC, Motorola, Google, Oneplus, Sony, Lenovo, ZTE and other Android devices directly. Meanwhile, this Android data recovery software is available for both Windows and Mac platforms.


Monday 16 July 2018

Top 5 Free MP4 Video Cutters for PC - Cut MP4 on Windows 10 for Free 2019 Guide


Top 5 Free MP4 Video Cutters for PC - Cut MP4 on Windows 10 for Free 2019 Guide


"I got some home videos in MP4 format. But I need to cut out the unnecessary portions from those MP4 for a special family gathering. Can you recommend a free MP4 video cutter that could trim MP4 videos losslessly on Windows 10? Thanks."


You may always need to cut MP4 videos for different purposes. In most cases, a comprehensive video editor could easily get the job done. But for most people, a dedicated MP4 video cutter is better as it performs video cutting more efficiently and accurately. In this review, we'll list the top 5 free MP4 cutters to help you split any MP4 video for free on Windows 10 without losing any quality.


See Also: 5 Best MP4 Cutters for Mac/Windows
#1. TunesKit Free Video Cutter


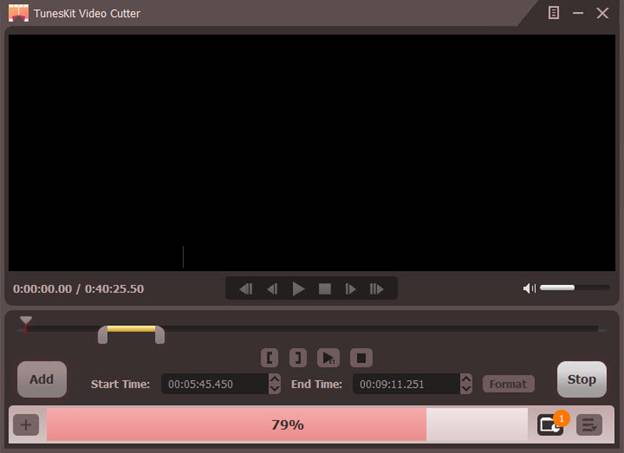
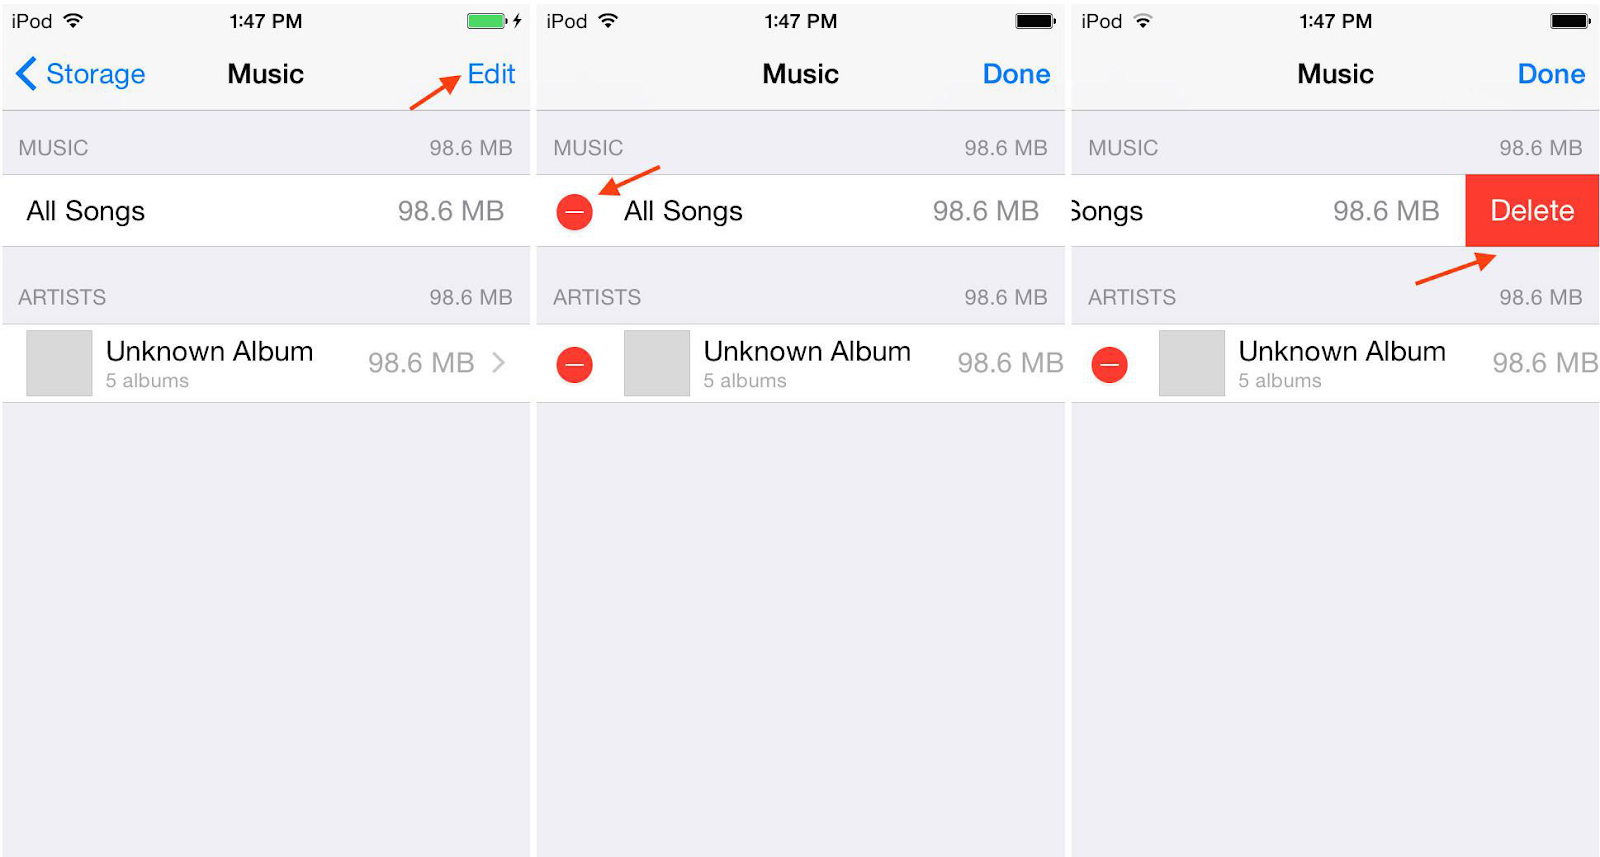
Want the most easy-to-use and lossless MP4 trimmer for PC? TunesKit Free MP4 Video Cutter is the best choice. It can not only cut your MP4 into multiple small segments, but also keep the 100% original quality while splitting the video. With the intuitive user interface, anyone could handle the video cutting process easily. It provides you with two modes to set the start and end points precisely, including using slider bar or setting the time manually.If you accidentally deleted or lost videos on iPhone, first please check on the Recently Deleted folder. Alternatively, you can use the professional tool Gihosoft iPhone Recovery to recover deleted iPhone videos from Camera Roll or some apps.


As a smart free MP4 cutter, TunesKit Free Video Cutter also allows you trim multiple portions from the same MP4 file and then merge those clips into a new video. In addition to MP4, it supports cutting other popular video formats as well, such as MOV, MKV, FLV, AVI, MPEG, 3GP, WMV, etc.


If you however are looking for a more powerful MP4 cutter that can save the video into other formats once trimmed, you can switch to the pro version, that is, TunesKit Video Cutter for Windows. It can not only cut MP4 video losslessly, but also split other videos as well as audio tracks on PC. For more details, read on: How to Cut MP4 Videos on Windows 10.


Pros


Cut MP4 and other videos with no quality loss


Cons


Can't convert MP4 to other formats after cutting


DownloadDownload
#2. Gihosoft Free Video Cutter


Gihosoft Free Video Cutter is another free and HD MP4 movie cutter to cut MP4 videos quickly and losslessly on PC. With spin buttons, it enables you to control every second while cutting the videos. The whole cutting process could be completed in 3 easy steps: import the MP4 file, set a time range for cutting, and save it as a new video. Apart from MP4 videos, Gihosoft Free Video Cutter also supports other video formats like AVI, MOV, MPEG, RM, ASF, WMV, 3GP, MKV, FLV. Once cut, you can save the new work in several popular formats with original quality.


Pros


Support lossless cutting


Cons


Output profiles need updated
#3. Free Video Cutter Expert


As a full-featured free MP4 cutter, Free Video Cutter Expert helps you to remove unwanted footages from all MP4 videos and other popular formats such as WMV, FLV, AVI, MPEG, MOV, MKV, 3GP, SWF, and VOB with ease. Under its assistance, you can cut MP4 or other videos into one or more clips with millisecond precision. It's embedded with a video player which allows you to preview the original video and destination file during the splitting process. Better still, you can add fade in or fade out effect to make the videos more excellent.


Pros


Auto-shut down the computer when the cut is done


Provide storyboard display and video player


Cons


Net Framework 2.0 is required
#4. Avidemux


Thanks to the simple UI, AvideMux makes it easy for even beginners to edit and cut MP4 videos. As a handy free MP4 trimmer, it lets you split your MP4 video files and others like DivX, MPG, FLV, MOV, etc. into smaller pieces with filters. The downside of this free MP4 video trimmer is its lack of timeline feature, without which you can't select a precise cutting portion.


Pros


Filter video clips


Cons


No timeline feature
#5. Movica


Movica is an open source free MP4 cutter with which you can edit and manage the videos quickly and easily. The simple editing features of Movica provide ability for you to cut videos in form of MP4 and AVI, WMV, FLV, MPG, RM, etc. accurately. What makes it different with other free MP4 video splitters is its support of short-cuts which make the video editing and cutting much easier. Besides cutting the video, it also supports merging several clips together according to your needs.
Sponsor ads:
Gihosoft Free iPhone Data Recovery:iphonerecovery.com
Free iPhone Data Recovery Software for Windows/Mac
Recover up to 12+ types of files, including contacts, SMS, photos, WhatsApp, Viber, notes, etc.
Restore lost data from iOS devices directly or from iTunes and iCloud backup
Recover iPhone data lost due to iOS upgrade/jailbreak, accidental deletion, device lost or broken
Support all the latest iPhone, iPad and iPod Touch
Both Free and Pro version.
If you lost data after you updated to a new iPhone, you can always use Gihosoft iPhone Data Recovery to get the data back from the old iPhone or backup.
Worth reading:download youtube 1080p
Jihosoft Android Data Recovery: the best Android Data Recovery software for Windows and Mac to recover deleted contacts, messages, photos, videos, WhatsApp and etc from Android
If you use android phones, please choose Gihosoft Android Data Recovery

How to Send Ringtones to iPhone through Email?


How to Send Ringtones to iPhone through Email?

Every iPhone user would welcome the idea of having a perfect alternative that allows them send ringtones to their iPhone – whether it is from their computer or another iPhone. Although sending ringtones via email is an old transfer method, it is still a substitute platform to escape the hassles of only making use of iTunes on your iPhone. To achieve this, here are a few detailed, yet practical steps.
From iPhone to iPhone


Login to your email account.


Got to “Compose” to send a new e-mail and make yourself the recipient of the mail. Before saving or downloading the file, first ensure it is in M4R format. Click on your preferred ringtone file and save the file by downloading it.


Go to the ringtone file you want to set on your iPhone, upload it as an attachment, and send the e-mail.


Sign into your email account on your iPhone and download the attached file.
From computer to iPhone


Go to your browser and sing into your email account from your computer.


Connect your phone to your computer with a USB cord and open iTunes on your device.


Go to the folder where you already saved the ringtone file and move it to the iTunes Library section at the upper left hand corner of your computer. Ensure the ringtone file is moved to the “tones” subcategory.


Move the ringtone file from iTunes to the “Devices” section of your iPhone. Your selected ringtone will automatically sync to your iPhone immediately the file is moved.


If you accidentally deleted or lost videos on iPhone, first please check on the Recently Deleted folder. Alternatively, you can use the professional tool Gihosoft iPhone Recovery to recover deleted iPhone videos from Camera Roll or some apps.

Clean Up Your Inbox’s Act With This Highly-Rated App [Deals Hub]

Are you inundated with emails the second you wake up? Wishing you could get your account under control? There’s an app for that! Clean Email...