Saturday, 16 June 2018

Top 6 Ways on How to Fix Slide to Unlock Not Working

Top 6 Ways on How to Fix Slide to Unlock Not Working


1Take off Screen Protector from Your iPhone/iPad

If your iPad won't swipe after you put a screen protector on it, you may have to remove it. A poor-quality screen protector can decrease the screen sensitivity sharply. By taking the screen protector off, you can restore the screen sensitivity and hence fixing the slide to unlock not working on iPad.
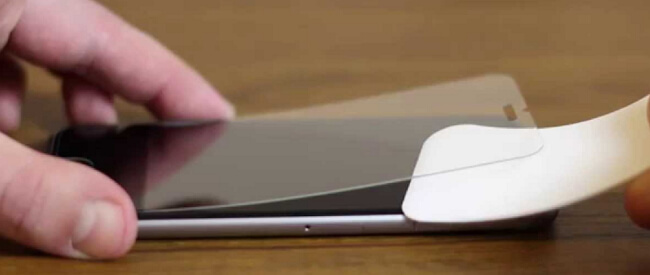
take-off-iphone-screen-protector

2Clean Your Hands or iPhone/iPad Screen

One of the reasons that the Slide to Unlock function may not work on your iPad or iPhone is due to moisture or dirt being present on the screen. Try cleaning your hands and the device screen and then check whether the Slide to Unlock will start working.

3Update iOS to The Latest Version

As we have indicated earlier on, one reason why you may be having the cannot slide to unlock iPad issue is due to your device does not run the latest iOS version. To fix this, you have to update the device. Follow the steps below to do this:
Step 1: Plug your iPhone or iPad into power. Connect your device to WiFi internet.
Step 2: Tap Settings, then General, and finally, tap Software Update.
Step 3: Select the Download and Install option. If the iOS requires more space for the update, you will be asked to remove some applications temporarily. Tap Continue. The removed applications will be reinstalled later by the iOS.
Step 4: If you would like to update right now, tap on Install. You will also have the option of installing the update later. To do this, tap on Later and select either Remind Me Later or Install Tonight. If you select Install Tonight, make sure that your device is plugged into power before you sleep.
Step 5: If prompted for a passcode, enter it.
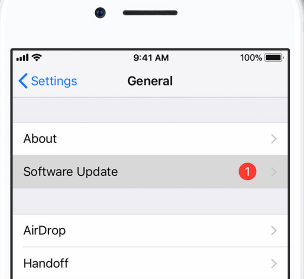
update-ios-version

4Hard Reboot Your iPhone/iPad with Buttons

A hard reboot may help you fix the issue causing your Slide to Unlock not to function. Since the slide is not working, you have to reboot the iPhone or iPad using the buttons. The following steps should help you do the hard reboot:
Step 1: Press and hold both the “Home” and “Wake/Sleep” buttons. These have to be pressed at the same time and held until the device screen goes dark.
Step 2: Wait for some time and then power your device on by pressing and holding “Sleep/Wake” button until the Apple logo shows.
Gihosoft iPhone Data Recovery is a professional iPhone Data Recovery software to get back all your lost text message, photo, video, call history, note, contact and more from iPhone/iPad/iPod Touch. It offers a full solution to recover your lost data in different tough situations. Besides recovering data directly from iPhone, iPad and iPod touch, it also allows you to recover data from iCloud and iTunes backup files.
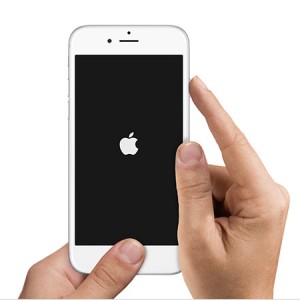
Reboot-iPhone

5Reset All Contents and Settings

In most cases, restoring your device to factory settings can fix the slide to unlock not working issue. However, make sure your device data is backed up before the reset. To reset, follow the steps below:
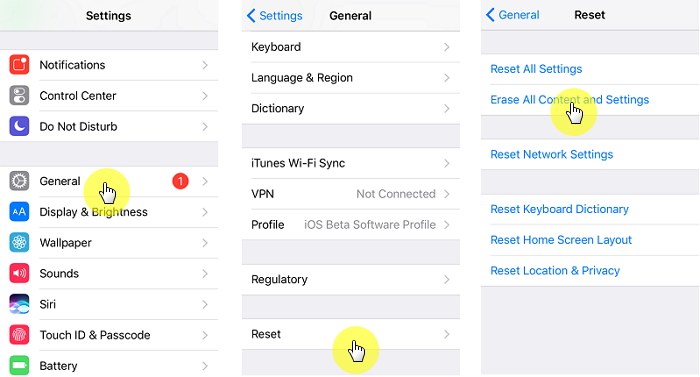
Step 1: Open settings, tap on General, and then Reset.
Step 2: Select the option for erasing all settings and contents. Tap on Erase iPhone in the pop-up that appears.
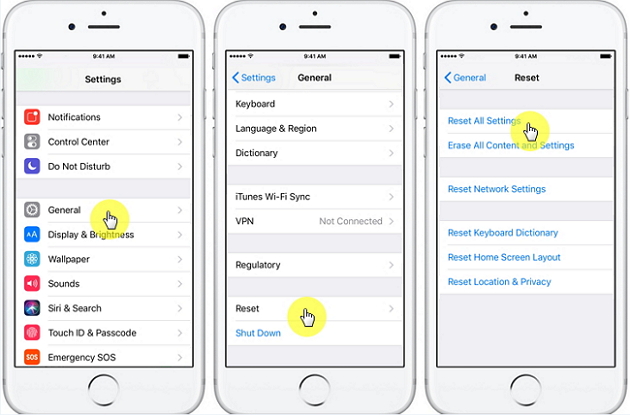
iphone-reset-all-settings

6Restore Your iPhone/iPad with iTunes

After resetting your device, you will need to restore its data. If you had used iTunes to backup your data, follow the following steps:
Step 1: Use the PC or Mac you had used to back up your iPhone or iPad to open iTunes.
Step 2: Using a USB cable, connect the iOS device to the computer. You may be asked to Trust This Computer or for a Passcode. Follow the on-screen steps for this.
Step 3: Your device should appear on iTunes. Select it.
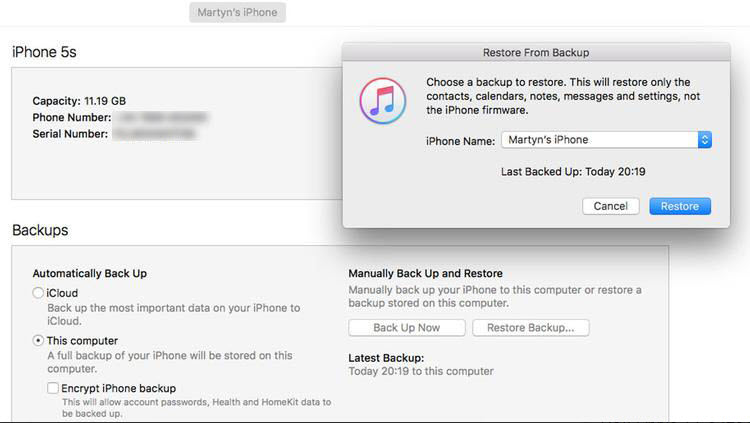
Step 4: In iTunes, choose Restore Backup.
Step 5: Pick the important backups.
Step 6: Click Restore. If asked for a password, provide it and wait as the backup gets restored.
Step 7: Don’t disconnect the device after the restart. Wait until the sync is finished before disconnecting.
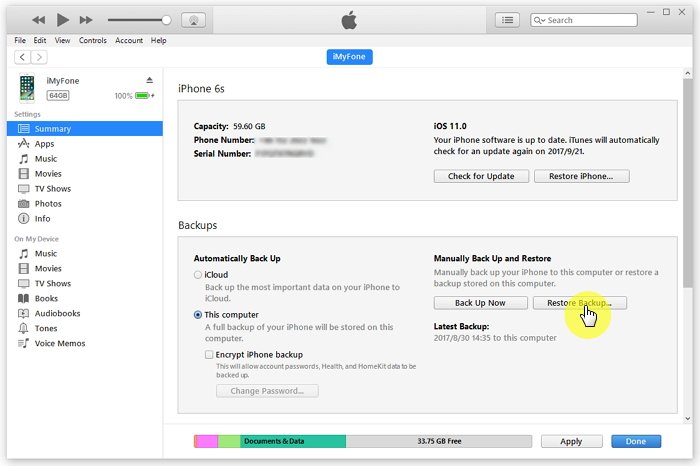
restore ipad from itunes backup

How To Read Erased Text Messages on iPhone

Read Erased Text Messages by Restoring from iTunes/iCloud Backup

1 From iTunes Backup

Every time you connect your iPhone to your computer it starts to create a backup. This backup can be used to restore deleted messages to your phone. However, this method only allows for data that has been previously backed up to be restored to your phone.

Connecting Your iPhone

Connect your iPhone to your computer and access iTunes. It should start automatically.

Restoring Backup

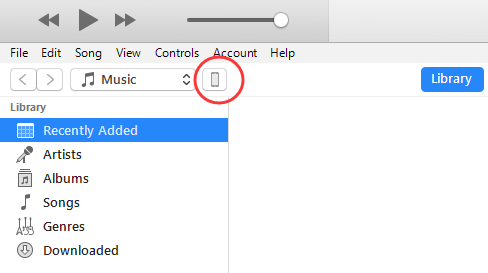
After that phone is connected you can see an option to open your device in the top left hand corner. The option to restore backup will be available once you access your device.
Any data that was present during your last backup, but deleted will now be added to your phone.
how-to-restore-iphone-from-itunes-backup

2 From iCloud Backup

iCloud is capable of backup all of the content on your phone to the cloud. That includes all of your text messages. You have to enable iCloud before it will backup the content from your phone. You also have to make sure that messages are set to backup your data. You can enable and disable the backup of certain datapoints.Gihosoft iPhone Data Recovery is a professional iPhone Data Recovery software to get back all your lost text message, photo, video, call history, note, contact and more from iPhone/iPad/iPod Touch. It offers a full solution to recover your lost data in different tough situations. Besides recovering data directly from iPhone, iPad and iPod touch, it also allows you to recover data from iCloud and iTunes backup files.

Go to Settings

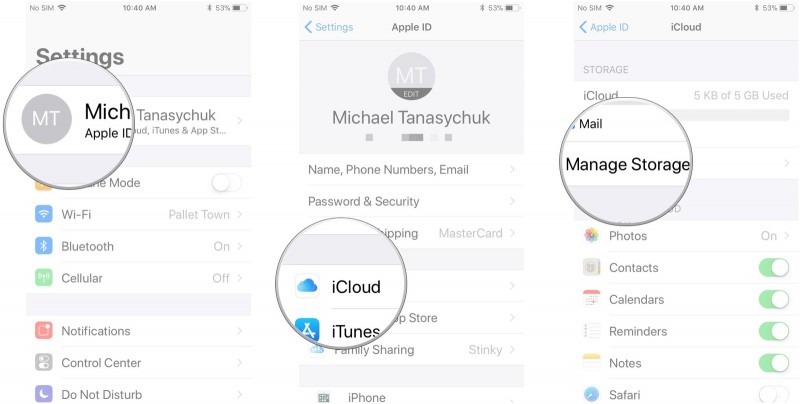
Open the iPhone that you wish to view erased messages, and go to the settings app. Once settings opens up, navigate to iCloud > Manage Storage > then Backup.
find icloud backup

Find the Right Backup

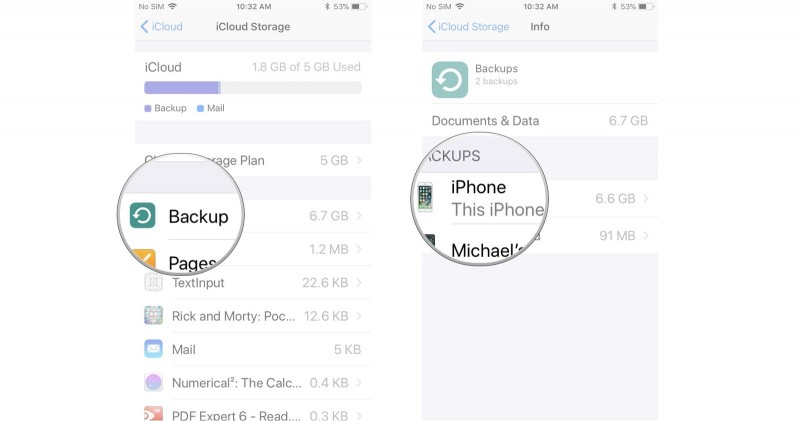
Under Backup you will see a list of data backups that have been created. They are listed by the name of the device and the amount of data. Once you tap the backup, you will be able to see the data that it was made.
restore from icloud backup

Erase Phone to Factory Settings

In the settings app you will have to have to restore the phone to the factory settings. That means any data since the backup will be deleted from your phone.
erase-all-content-and-settings-iphone

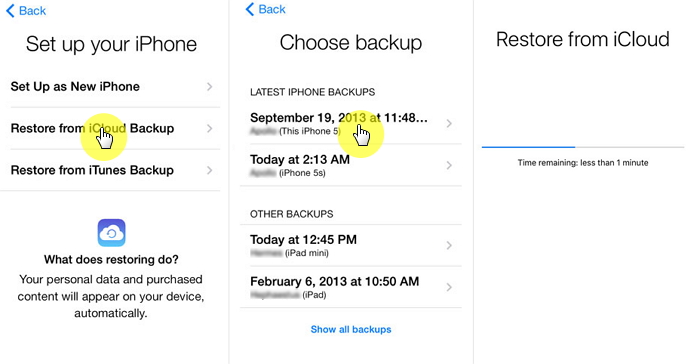
Restore from iCloud Backup

When your phone is done being restored, you will go through the setup process. During that you will log into your Apple account and the device will ask if you want to restore to an iCloud backup. Once the device is finished with the restoration process your deleted messages will be there.
restore-iphone-from-icloud-backup

Friday, 15 June 2018

iPhone Locked after Update?

iPhone Locked after Update? Unlock iPhone with iTunes

If your iPhone locked up after update, you can also unlock it with iTunes. This method is directed to those ones who synchronize their iPhones with iTunes. It’s also important to remember that you will lose any previous data if you’re using this method.
Actually, unlocking your iPhone with iTunes actually means erasing the whole device so you can also erase the passcode. For restoring your device with iTunes, follow these steps:
  1. Connect your iDevice to the computer you use for sync.
  2. Open iTunes (if you’re asked for a passcode, try recovery mode or another computer where you synced).
  3. Wait for your iPhone to recognized with iTunes.
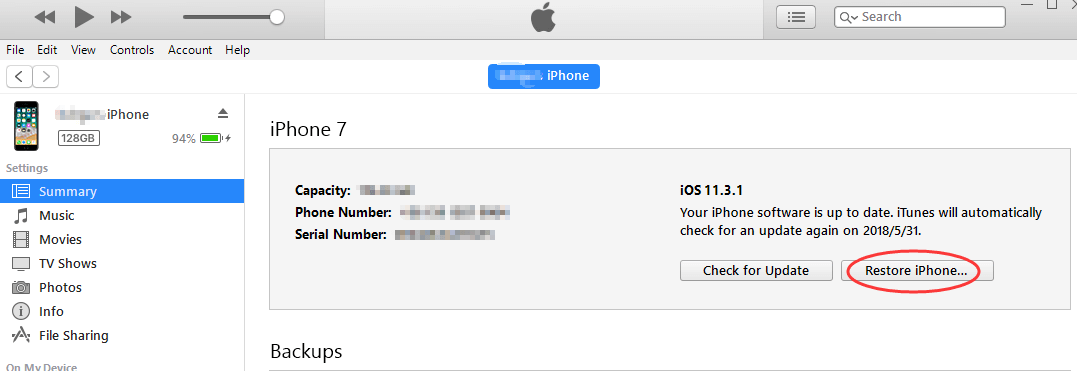
  4. When it’s recognized, select it from the iPhone icon and then go to “Summary”. click on “Restore iPhone”.
  5. iphone-icon
  6. After clicking on it, just keep continue to restore your iPhone. When it finishs, your iPhone lock will be removed.
  7. restore-iphone
  8. 2 iPhone Locked after Update? Unlock iPhone Using Recovery Mode

  9. In case you never synced your iPhone locked after update to any computer, you can still restore it with the recovery mode method. This method will also erase all the data on your iPhone.
    1. Connect your iPhone to your computer. Launch iTunes.
    2. Turn off your iPhone first, then you can put your iPhone into Recovery Mode.
    3. For iPhone 8, iPhone 8 Plus, iPhone X: press and quickly release the volume up button. Repeat with the volume down button. Finally, press and hold the Sleep/Wake button and you’ll see the the icon "Connect to iTunes"
    4. For iPhone 7 or 7 Plus: press and hold the Sleep/Wake button and the volume down button at the same time and keep pressing until you see the icon "Connect to iTunes".
    5. For iPhone 6s or earlier: press and hold the Home button and the Sleep/Wake button at the same time and keep holding until you see the icon "Connect to iTunes".
    6. After connect your iPhone to the iTunes. It will detect that your iPhone is in the recovery mode.
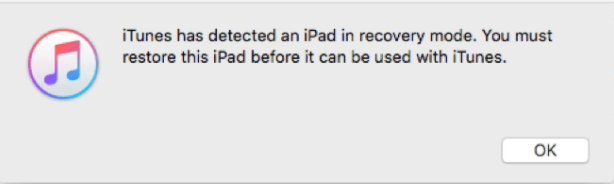
    7. A message will show up and tell you that your iPhone is detected in recovery mode and you should restore it before you can use it.
    8. Just click "OK" and it will be automatically recovered.
  10. itunes-detect-recovery-mode
  11. With these methods, you’ll be able to unlock your iPhone and iPhone locked up after update will no longer a problem. Gihosoft iPhone Data Recovery is a professional iPhone Data Recovery software to get back all your lost text message, photo, video, call history, note, contact and more from iPhone/iPad/iPod Touch. It offers a full solution to recover your lost data in different tough situations. Besides recovering data directly from iPhone, iPad and iPod touch, it also allows you to recover data from iCloud and iTunes backup files.


Monday, 11 June 2018

The Main Reasons of “iTunes Has Stopped Working” Windows 7

The Main Reasons of “iTunes Has Stopped Working” Windows 7

Many iTunes and Windows experts are of the opinion that “iTunes has stopped working” Windows 7 stems from the following sources:
  • Missing files on iTunes library.
  • Incompatibility error between the iTunes software and Windows 7.
  • Outdated PC framework.
There may still be other reasons why iTunes is not working on your PC. However, we shall be looking at the best ways to fix this problem in the following paragraphs.
Do you like this story?
Sponsor Ads:
Gihosoft iPhone Data Recovery is a professional iPhone Data Recovery software to get back all your lost text message, photo, video, call history, note, contact and more from iPhone/iPad/iPod Touch. It offers a full solution to recover your lost data in different tough situations. Besides recovering data directly from iPhone, iPad and iPod touch, it also allows you to recover data from iCloud and iTunes backup files.

Other Ways to Fix “iTunes Has Stopped Working” Windows 7

The following solutions are second to the TunesFix, but they can still be used to solve this type of iTunes error.

1. Start iTunes in Safe Mode

There are two know ways you can run an application on Windows 7 PC, the first one is by double-clicking the application, while the second is by running the program in safe mode. Safe mode simply means isolating iTunes software from every interference that can be caused by plugins or third-party scripts.
Step 1: Hold down the Shift + Ctrl keys instantaneously, and then double-click on iTunes icon.
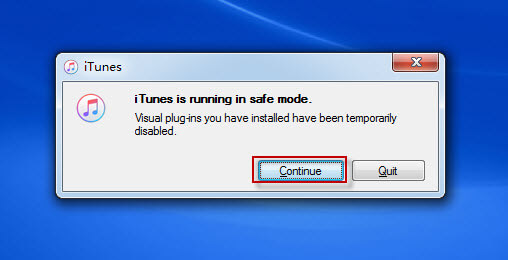
Step 2: A notification with the instruction “iTunes is running in safe mode” will appear. Click “Continue” tab to start iTunes in safe mode.
itunes safe mode

2. Remove Third-Party Plug-ins, Add-ons, and Scripts

Third party add-ons, plug-ins and scripts that were not developed by Apple Inc. can interfere with the performance of iTunes software on Windows 7/8/10 PC. You can remove third-party plug-ins, add-ons, and scripts from iTunes by following these steps.
Step 1: Hold down the Windows key on your Keyboard and press “E” to open File Explorer or Windows Explorer.
Step 2: Click ‘This PC” or “My Computer”.
Step 3: Navigate to the following locations: C:\Users\username\App Data\Roaming\Apple Computer\iTunes\iTunes Plug-ins and C:\Program Files\iTunes\Plug-ins.
Step 4: Move the plug-ins to a different location like a desktop.
Step 5: Run iTunes again.
remove plug-ins

3. Uninstall and Re-install iTunes and Its Related Software Components

Sometimes, working only on iTunes in the face of “iTunes stopped working” Windows 7 error is not very successful. It’s good to search for solutions beyond iTunes and include its software components. Uninstalling and reinstalling these iTunes software components would help to solve the problem.
Step 1: Hold down the Window key on the Keyboard and press “R”.
Step 2: Type “appwiz.cpl” and press the Enter key to open “Program and Features”.
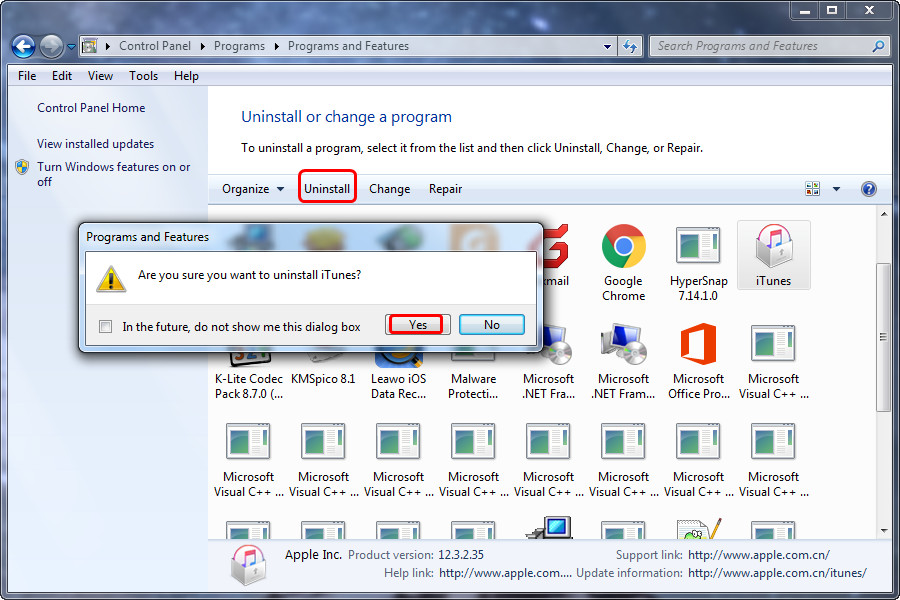
Step 3: Navigate to iTunes, right click on it, and then choose “Uninstall”.
uninstall itunes
Step 4: Repeat step 3 for the following programs:
  • iTunes
  • Apple Software Update
  • Apple Mobile Device Support
  • Bonjour
  • Apple Application Support 32-bit
  • Apple Application Support 64-bit
Step 5: Restart your PC.
Step 6: Launch your browser, go to Apple website, download and install iTunes.
Step 7: Test iTunes on your Windows 7/8/10 PC.


Sunday, 10 June 2018

How to Transfer Data from iPad to iPad with iCloud

You may also want to transfer your data to iPad using iCloud. To use iCloud, you must have previously backed up your data to iCloud. If you had done so, the following steps will guide you.
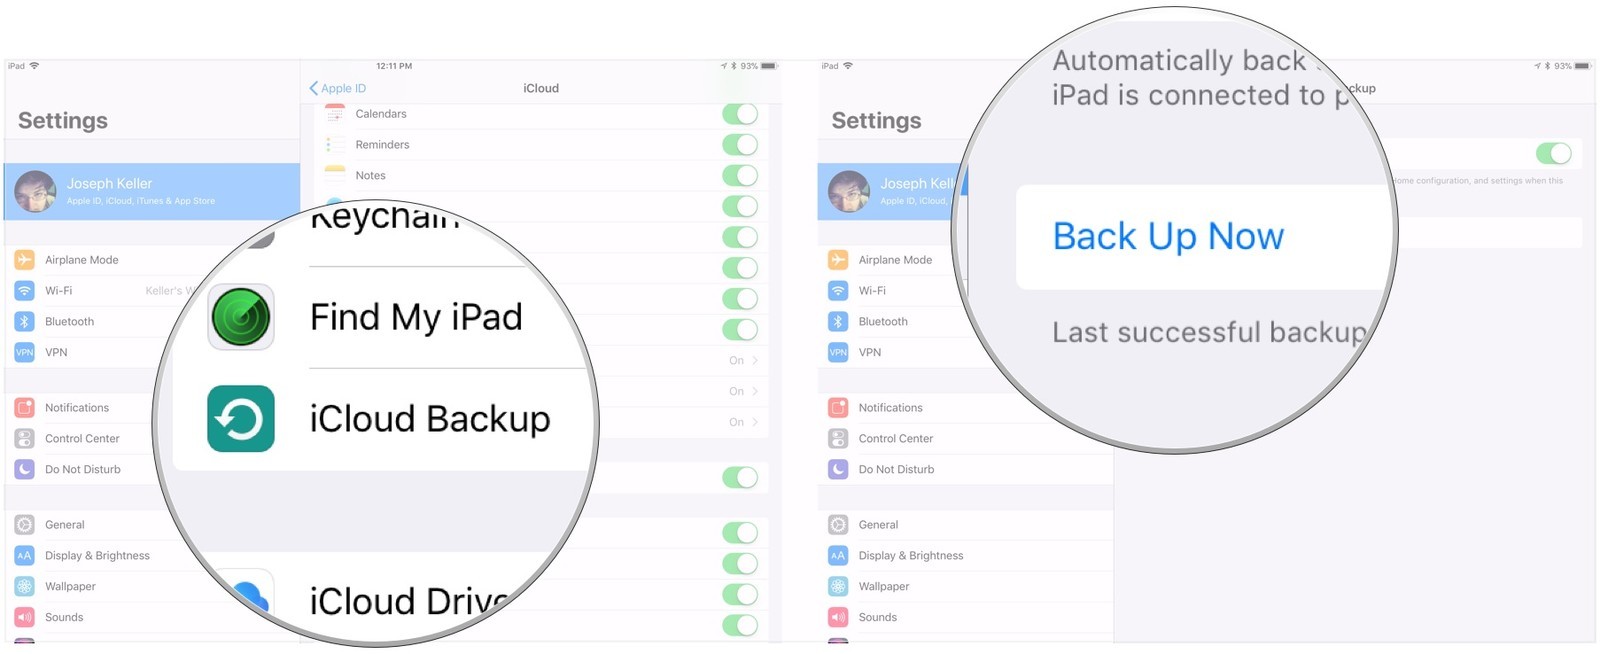
  • Go to Settings>iCloud ID>iCloud on your old iPad.
  • Select iCloud Bakcup>Back Up Now.
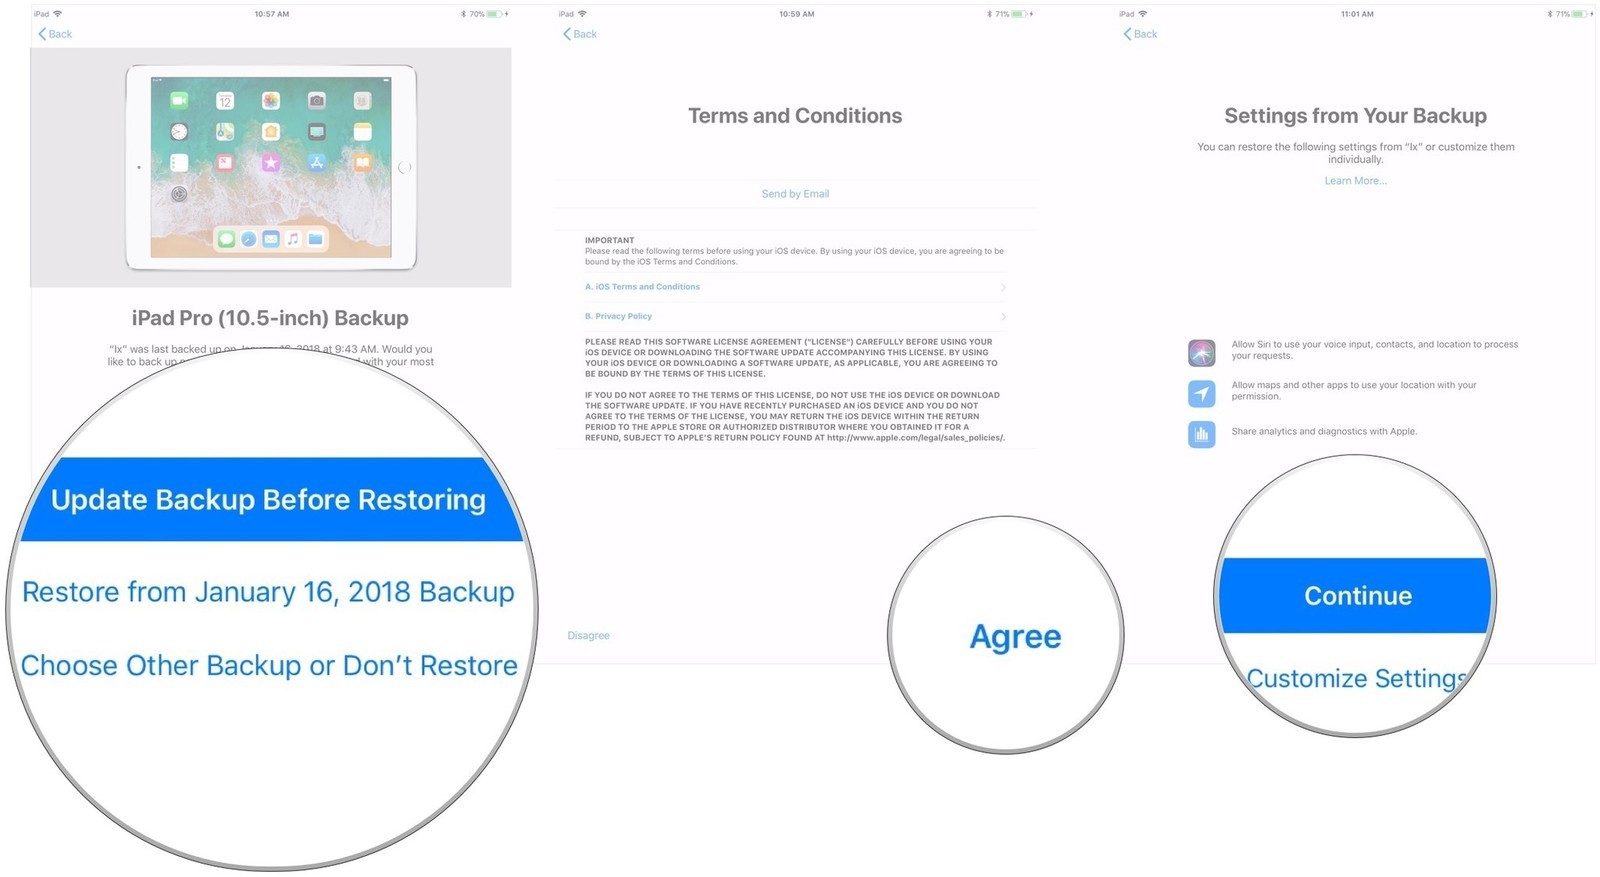
  • Then open your new iPad to restore the backup.
  • In activation process, choose Restore from iCloud Backup.
  • Sign in your Apple ID and choose a most recent date backup when prompted.
  • Let the iPad remain connected to Wifi to complete the transfer.


To sum up, you can transfer data from iPad to iPad by using iTunes and iCloud. But iTunes usually backup and restore unsuccessfully due to various errors and iCloud need to pay extra when the iCloud storage is beyond 5GB.
Do you like this story?
Sponsor Ads:
Gihosoft iPhone Data Recovery is a professional iPhone Data Recovery software to get back all your lost text message, photo, video, call history, note, contact and more from iPhone/iPad/iPod Touch. It offers a full solution to recover your lost data in different tough situations. Besides recovering data directly from iPhone, iPad and iPod touch, it also allows you to recover data from iCloud and iTunes backup files.


Friday, 8 June 2018

How to Get the iOS 12 Public Beta when it's released

What will iOS 12 be like?

iOS 12 will be packed with a few new features but will mostly focus on performance and stability. Because iOS 11 was such a disaster (and still partially is), Apple has pushed all the new features planned to iOS 13. This means that iOS 12 will be focusing on performance and removing and fixing all remaining bugs and glitches. This is all welcome as with iOS 11 being a disaster and Apple admitting to slowing down old iPhones, it hasn’t exactly been a pleasant month for users in the Apple Ecosystem.

Any Risks of Installing a Beta Software?

Before proceeding, I have to mention that it isn’t a good idea to run a new software at such an early stage on your daily driver. I will because I have to cover the betas and personally I don’t mind the bugs and glitches that much. Please do this at your own risk. If you damage your device or brick it (probably won’t happen but worst-case scenario), Apple will not be responsible for it.

How do you get the iOS 12 Public Beta?

However, if you decide to use iOS 12 at this early stage, then I wish you the best and hope you enjoy it. Now, firstly click on the following link:


This will take you to the Beta Program page on Apple’s website.

Click ‘Sign In’. You will be prompted to enter your Apple ID logins. Once logged in, it will redirect you to a ‘Guide for Public Betas’ page.
Click iOS. Scroll down to the paragraph under the ‘Get Started’ heading.
Click on ‘enroll your iOS Device’. It will be highlighted in blue due to being a hyperlink.
You will then be redirected to a ‘Enroll Your Devices to Get Public Beta Software’ page.

Scroll down to the ‘Download Profile’ heading.

And click on the link. Then follow the instructions and once installing the profile, restart your device.

IMPORTANT

Do this once iOS 12 is released as a new configuration for the profile will be chosen for iOS 12!

If you have any questions or comments, feel free to leave them below!
Do you like this story?
Sponsor Ads:
Gihosoft iPhone Data Recovery is a professional iPhone Data Recovery software to get back all your lost text message, photo, video, call history, note, contact and more from iPhone/iPad/iPod Touch. It offers a full solution to recover your lost data in different tough situations. Besides recovering data directly from iPhone, iPad and iPod touch, it also allows you to recover data from iCloud and iTunes backup files.

How to Enable or Disable Automatic Software Updates in iOS 12 on iPhone or iPad


Apple introduces new iOS 12 for iPhone and iPad which is tremendously fast than iOS 11. Coming to the feature of iOS 12, Apple added a new menu inside the software update section that is an Automatic update.

Many of users were annoyed before as it automatically updates the iOS version when connected to Wifi and gets installed on their devices.

There was no any way to turn off automatic updates in the previous iOS but a now huge improvement has been made in iOS 12 for disabling the automatic updates.

86 iOS 12 hidden features

Now Apple has made it very simple to enable or disable the automatic software updates in iOS 12 and here’s how;

How to enable Automatic Software Updates on iOS 12

Now you do not have to worry about the automatic iOS updates that are happening without knowing to you.
  1. Go to Settings
2. Then tap on General

3. Next tap on Software Update

4. Here you will see a new toggle option to turn or turn off the automatic updates.


5. Simply turn on or turn off the automatic update toggle as your wish.


Do you like this story?
Sponsor Ads:
Gihosoft iPhone Data Recovery is a professional iPhone Data Recovery software to get back all your lost text message, photo, video, call history, note, contact and more from iPhone/iPad/iPod Touch. It offers a full solution to recover your lost data in different tough situations. Besides recovering data directly from iPhone, iPad and iPod touch, it also allows you to recover data from iCloud and iTunes backup files.

Clean Up Your Inbox’s Act With This Highly-Rated App [Deals Hub]

Are you inundated with emails the second you wake up? Wishing you could get your account under control? There’s an app for that! Clean Email...